
Log in
Similar topics
Latest topics
Saturday 7/7/18
2018-07-07, 21:07 by Gary M Jones
I was at the field today between 14:00 & 15:00 all on my own , good flying too. There is a dead sheep along the fence line towards the gate from the pits, I saw the farmer so reported this to her. I hope no one had plans for a BBQ  .
.
Farmer …
Farmer …
Comments: 1
Focke Wulf 190 F4C 1/4 Scale
+4
Rich
Brian Colclough
Zaidy
Mark Barnes
8 posters
Page 4 of 7
Page 4 of 7 •  1, 2, 3, 4, 5, 6, 7
 ![]()
Re: Focke Wulf 190 F4C 1/4 Scale
![]() by Mark Barnes 2010-03-11, 12:58
by Mark Barnes 2010-03-11, 12:58
Richard,
Do you tot up a total cost of a project? I know a few scale guys and they go white at the mear mention of it lol, just would be intrested to know the cost of such a project aside from the kit/motor/servos. as i bet the couple of quid here, a few ponds there realy adds up on a project of this scale
M

Mark Barnes- Club Secretary
- Posts : 6607
RDMFC Bonus points : 8240
Join date : 2008-11-16
Location : Rhyl North Wales
Re: Focke Wulf 190 F4C 1/4 Scale
![]() by Guest 2010-03-12, 17:05
by Guest 2010-03-12, 17:05
I'm often asked this question. One doesn't add it up because they are very expensive. It's the little bits that keep adding up. The retracts were over £500 and then I needed the bits to make them work (3 sets of tanks, guages etc, haven't told you yet about the air operating sliding canopy) another £100 adds up. The engine was £ cough  , so by the time you add onto the materials list, the radio gear (dual redundancey), wheels, bomb rack, paint, cockpit, sliding canopy, pilot (£250 if with remote control head and arms. Er no, I went for the basic £100!) fibreglass cloth etc etc etc etc etc etc were more than on our way to buying a new Ford Fiesta and of course what value does one put on the labour
  I know someone in the US who is a professional builder and he charges $5,000 labour plus parts.
If one was to add it up, one probably wouldn't let it get airborne. If it should go home one day, the wrong way, well thats life.
If one was to add it up, one probably wouldn't let it get airborne. If it should go home one day, the wrong way, well thats life.
Guest- Guest
Re: Focke Wulf 190 F4C 1/4 Scale
![]() by Guest 2010-03-12, 17:10
by Guest 2010-03-12, 17:10
Richard Ill sit in the cockpit for £50 that should save you a bit
Last edited by johnoxleydean on 2010-03-12, 17:11; edited 1 time in total (Reason for editing : wrong smily)
Guest- Guest
Re: Focke Wulf 190 F4C 1/4 Scale
![]() by Guest 2010-03-21, 23:24
by Guest 2010-03-21, 23:24
John your a brave man 
The rudder has now been put together and framed to maintain an accurate contour with the fin and then covered with linen Solatex.

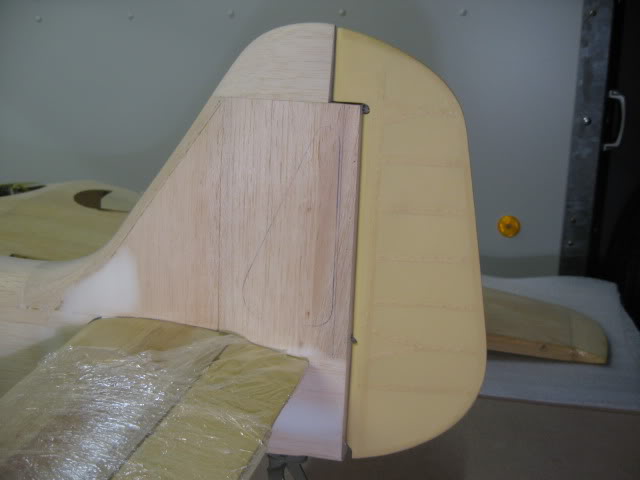
The rib stitching was done the same as the elevators and ailerons with PVA glue simulating the stitching below the pinked tape. Trying to maintain a parallel edge with the pinked tape to the rudder outline around the curve at the tip and base was an event in itself. So easy to “shrink out” or crease the pinked edges.


The rudder is dry fitted (needs to be removable for painting later) and the pro-skin shrouds were installed.

This is what I’m trying to replicate on a full size FW190 that I visited being restored in the USA.

Next task is to add the rear navigation light and trim tab. Then hopefully I can fibreglass cloth the fuselage and fin. Soon be ready to apply the first coat of primer paint.
The rudder has now been put together and framed to maintain an accurate contour with the fin and then covered with linen Solatex.
The rib stitching was done the same as the elevators and ailerons with PVA glue simulating the stitching below the pinked tape. Trying to maintain a parallel edge with the pinked tape to the rudder outline around the curve at the tip and base was an event in itself. So easy to “shrink out” or crease the pinked edges.
The rudder is dry fitted (needs to be removable for painting later) and the pro-skin shrouds were installed.
This is what I’m trying to replicate on a full size FW190 that I visited being restored in the USA.
Next task is to add the rear navigation light and trim tab. Then hopefully I can fibreglass cloth the fuselage and fin. Soon be ready to apply the first coat of primer paint.
Guest- Guest
Re: Focke Wulf 190 F4C 1/4 Scale
![]() by Guest 2010-03-24, 18:59
by Guest 2010-03-24, 18:59
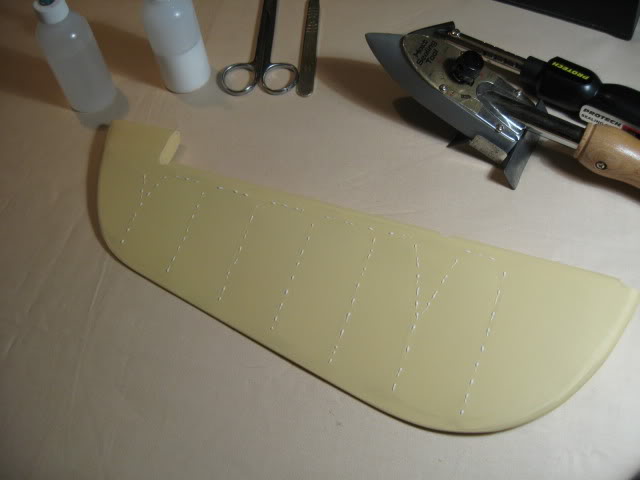
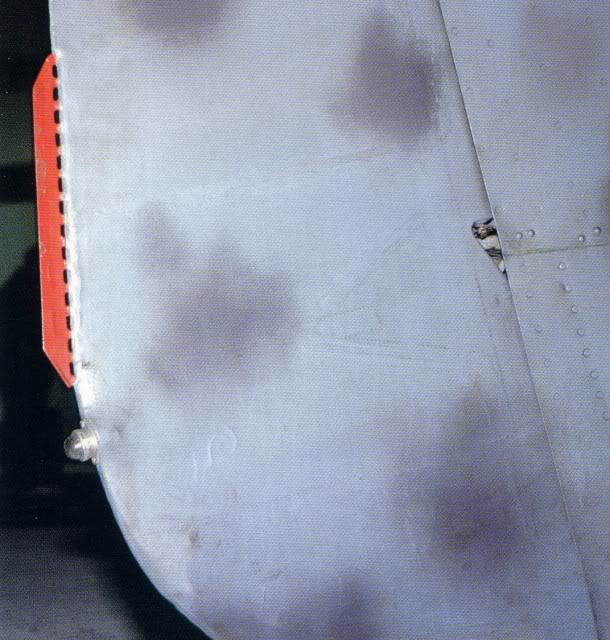
Trim tab and Navigation light holder now installed. I'll wait till after painting before adding the LED light. The trim tab on the restoration (above photo) is actually incorrect. They have linen covered the tab when infact it wasn't. Just goes to show how one can't exepct to follow restorations and be correct. Getting near to fibreglassing the fuselage. Need to check for any blemishes and hanger rash.


Guest- Guest
Re: Focke Wulf 190 F4C 1/4 Scale
![]() by Guest 2010-03-28, 21:17
by Guest 2010-03-28, 21:17
It won't be long before the first coat of primer goes on (and then straight back off  ). Managed to get the fuselage fibreglass skinned this weekend.


Guest- Guest
Re: Focke Wulf 190 F4C 1/4 Scale
![]() by Rich 2010-03-28, 21:31
by Rich 2010-03-28, 21:31
looks pretty sweet, well done if only I had the time.!!

Rich- Treasurer/Membership Secretary
- Posts : 4742
RDMFC Bonus points : 5694
Join date : 2008-11-18
Location : 53.3200°N, 3.4726°W -

Guest- Guest

Tim- Committee Member
- Posts : 2968
RDMFC Bonus points : 3235
Join date : 2008-11-18
Location : Tim Mackey lives in Deganwy
Re: Focke Wulf 190 F4C 1/4 Scale
![]() by Guest 2010-04-26, 22:32
by Guest 2010-04-26, 22:32
Tim it's a doddle
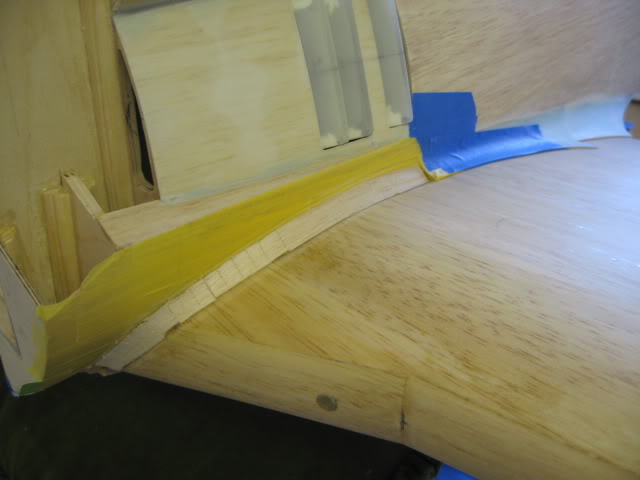
Work and family commitments has caused progress at the workbench to be slow, however as I have been able to finish glass cloth covering the fuselage, I turned my attention to 2/3 of wing chord fillet as suggested some time back.
For the chord fillet the plans suggest using 1/6” balsa sheet. Not that easy, as it requires a very tight compound curve, which I found snaps the balsa, even after soaking in diluted ammonia. I also have doubts as to its longevity when it comes to man handling the fuselage, during transportation and securing the wings on and off. I deviated from the plans and used blue foam, which was sanded down using varying grits of sandpaper. I was also able to get a razor sharp edge which I require …….

This is the process for the middle and rear section of the fillet (the front fillet will later be formed onto the wing, allowing a compound curve around the wing leading edge and retaining scale detail, not only in looks but also in construction) ...….

Once sanded the fibreglass cloth is applied …….

When the epoxy is cured the excess cloth is trimmed and the edges sanded leaving no visible sign of an overlap. Job done.

Final scale detail will be added nearer the painting stage i.e. the hinge. This is what I’m trying to replicate.

And this is how the front fairing on the prototype is done. I will not be doing this until I’ve finished a couple of odd jobs on the underside of the wing, fear of it being damaged.

My next task is setting up the air operated sliding canopy, which is an “add on” from the USA.
Work and family commitments has caused progress at the workbench to be slow, however as I have been able to finish glass cloth covering the fuselage, I turned my attention to 2/3 of wing chord fillet as suggested some time back.
For the chord fillet the plans suggest using 1/6” balsa sheet. Not that easy, as it requires a very tight compound curve, which I found snaps the balsa, even after soaking in diluted ammonia. I also have doubts as to its longevity when it comes to man handling the fuselage, during transportation and securing the wings on and off. I deviated from the plans and used blue foam, which was sanded down using varying grits of sandpaper. I was also able to get a razor sharp edge which I require …….
This is the process for the middle and rear section of the fillet (the front fillet will later be formed onto the wing, allowing a compound curve around the wing leading edge and retaining scale detail, not only in looks but also in construction) ...….
Once sanded the fibreglass cloth is applied …….
When the epoxy is cured the excess cloth is trimmed and the edges sanded leaving no visible sign of an overlap. Job done.
Final scale detail will be added nearer the painting stage i.e. the hinge. This is what I’m trying to replicate.
And this is how the front fairing on the prototype is done. I will not be doing this until I’ve finished a couple of odd jobs on the underside of the wing, fear of it being damaged.
My next task is setting up the air operated sliding canopy, which is an “add on” from the USA.
Guest- Guest
Re: Focke Wulf 190 F4C 1/4 Scale
![]() by Guest 2010-05-02, 20:29
by Guest 2010-05-02, 20:29
Trying to retro fit the pneumatic canopy system turned out to be a game and a half. Somewhere down in there it has to go …..

Eventually I got there but I could have done with an arm that was double jointed and broken in three places. In the photo you can see the ram cylinder mounted on an alloy plate and the push rod extended to a “slide” of flat ¾” wide aluminium that runs on top of a similar size greased plastic rail back through the alloy mounting plate..

As the air cylinder is operated, the slide moves back and forth out of sight underneath the top deck behind the pilots seat (photo has the fuselage lying on its back). Connected in the centre of the “slide” are two in-line centre bolts which protrude up through a slot in the fuselage decking (bolts not shown but yellow arrow marks the slot position) and will be connected to a fixed former inside the canopy (when I get round to it) which will open and shut the canopy.

The other arrow with the red dot is highlighting the side canopy rails, (one each side of cockpit) which are grooved to allow a bolt to run along the length keeping the canopy running true and in position. They are slightly angled which raise the canopy as it traverses backwards as per the real McCoy. Trying to get the ram-sliding rail under the decking to be at the same angle as the side rails was a nightmare.
Hope to post some more on the canopy soon.
Eventually I got there but I could have done with an arm that was double jointed and broken in three places. In the photo you can see the ram cylinder mounted on an alloy plate and the push rod extended to a “slide” of flat ¾” wide aluminium that runs on top of a similar size greased plastic rail back through the alloy mounting plate..
As the air cylinder is operated, the slide moves back and forth out of sight underneath the top deck behind the pilots seat (photo has the fuselage lying on its back). Connected in the centre of the “slide” are two in-line centre bolts which protrude up through a slot in the fuselage decking (bolts not shown but yellow arrow marks the slot position) and will be connected to a fixed former inside the canopy (when I get round to it) which will open and shut the canopy.
The other arrow with the red dot is highlighting the side canopy rails, (one each side of cockpit) which are grooved to allow a bolt to run along the length keeping the canopy running true and in position. They are slightly angled which raise the canopy as it traverses backwards as per the real McCoy. Trying to get the ram-sliding rail under the decking to be at the same angle as the side rails was a nightmare.
Hope to post some more on the canopy soon.
Guest- Guest
Re: Focke Wulf 190 F4C 1/4 Scale
![]() by Guest 2010-05-24, 18:25
by Guest 2010-05-24, 18:25
I had to stop on the canopy and further cockpit detail as I discovered I need the dimensions and fit of a pilot  to get everything in proportion. After searching around the .net I managed to track down a Dragon 1/6th scale pilot from Japan. The detail is incredible and stand 12" tall and weigh about 6 ounces. You can get all sorts of add-ons from Hong Kong via ebay They cost around £65 on the net and without the extras. They cost up to near £100 if purchased from Fighter Aces in the UK and are superior to BBI figures etc.

This handsome chap has the extra parachute, life jacket, flying cap with throat mike, oxygen mask and a scale map of the mediterranean
Also while I was searching around I managed to get my hands on this new one on ebay for £25 complete with extras, compass, sword and binoculars. What a saving but now I shall have to build a zero for him


Now I can get on with building and makes some more posts soon.
This handsome chap has the extra parachute, life jacket, flying cap with throat mike, oxygen mask and a scale map of the mediterranean
Also while I was searching around I managed to get my hands on this new one on ebay for £25 complete with extras, compass, sword and binoculars. What a saving but now I shall have to build a zero for him
Now I can get on with building and makes some more posts soon.
Guest- Guest
Re: Focke Wulf 190 F4C 1/4 Scale
![]() by Guest 2010-05-24, 18:36
by Guest 2010-05-24, 18:36
Richard - do you have a building thread somewhere that can be seen without login in ?
I know a few guys that would love to have a look at it
Cheers
Rob
I know a few guys that would love to have a look at it
Cheers
Rob
Guest- Guest
Re: Focke Wulf 190 F4C 1/4 Scale
![]() by Mark Barnes 2010-05-24, 18:39
by Mark Barnes 2010-05-24, 18:39
If not i may consider opening this section up to non members, as I think this should be enjoyed by many
M
M
Mark Barnes- Club Secretary
- Posts : 6607
RDMFC Bonus points : 8240
Join date : 2008-11-16
Location : Rhyl North Wales
Re: Focke Wulf 190 F4C 1/4 Scale
![]() by Guest 2010-05-25, 22:00
by Guest 2010-05-25, 22:00
Guy's my loyalty is to RDMFC forum with this thread.
Guest- Guest
Re: Focke Wulf 190 F4C 1/4 Scale
![]() by Guest 2010-06-01, 23:27
by Guest 2010-06-01, 23:27
During the time I was waiting to find my “pilot Adolf” I tinkered around with a few jobs between competition flying (recently finished 2nd with my Stuka at the “Traplet Publications” Scale event hosted by Liverpool & DMFC and what a flying field, awesome ).
I finished the cockpit side panels which still need to be weathered and will do this once it is all installed and the aircraft has been completely painted.

I also made the joystick from styrene tubing and resins for the top and bottom parts. I tinkered with weathering it now, as it will be difficult after it is installed and it seemed to have come out nicely using the dry brush method .

I finished the cockpit side panels which still need to be weathered and will do this once it is all installed and the aircraft has been completely painted.
I also made the joystick from styrene tubing and resins for the top and bottom parts. I tinkered with weathering it now, as it will be difficult after it is installed and it seemed to have come out nicely using the dry brush method
Guest- Guest
Re: Focke Wulf 190 F4C 1/4 Scale
![]() by Guest 2010-06-01, 23:31
by Guest 2010-06-01, 23:31
Another task was to make a nice fit for the wing saddle and using “Monokote” as a barrier ironed to the wing, “Plastic Padding” elastic car body filler was thinly applied to the saddle. The wing was then bolted down in place. Once dried the wing was removed (filler won’t stick  to “Monokote” and is easy to reheat and peel of without leaving a stick mess or damage to the glassed wood surface, phew
  ). The advantage of using this filler is it is very strong, won’t crack and can be painted with little preparation. It will add little weight and no big deal, however a bit here and there all adds up in the end
  .
.


). The advantage of using this filler is it is very strong, won’t crack and can be painted with little preparation. It will add little weight and no big deal, however a bit here and there all adds up in the end
Guest- Guest
Re: Focke Wulf 190 F4C 1/4 Scale
![]() by Rich 2010-06-01, 23:39
by Rich 2010-06-01, 23:39
getting there , I haven't got the patience
well done on your part
well done on your part
Rich- Treasurer/Membership Secretary
- Posts : 4742
RDMFC Bonus points : 5694
Join date : 2008-11-18
Location : 53.3200°N, 3.4726°W -
Re: Focke Wulf 190 F4C 1/4 Scale
![]() by Guest 2010-06-01, 23:40
by Guest 2010-06-01, 23:40
Now that I have a perfect fit for the wing seating, I was able to finish off the front saddle/wing root fillet. The centre and re-part was mentioned earlier in the build using blue foam and attached to the fuselage, (note the location of the jointing face of the middle fillet covered with blue tape, see later ).

The front fillet is fixed to the wing and for support I used several small pieces of 3/8” triangle balsa glued to the wing (note protective tape preventing any creeping glue sticking the fuselage to the wing).
Then it was covered with “Plastic Padding” and to strengthen the top lip from hanger rash “Microballons” were mixed into the paste. Once the filler had cured and sanded to the correct curvature, the wing was removed …… err no, not exactly, it was stuck fast .
.
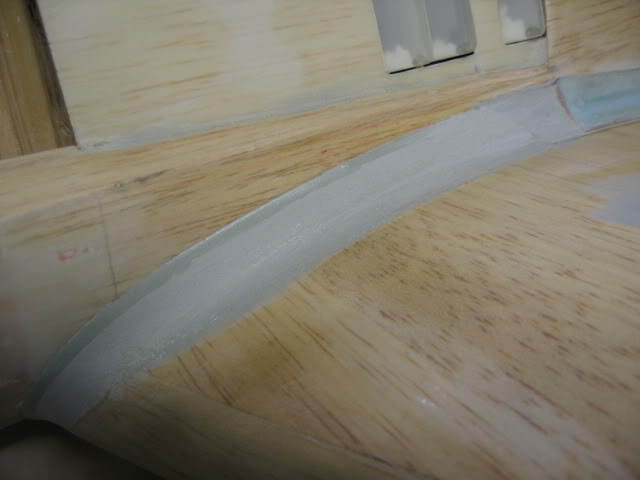
I had anticipated that the joint between the front and middle fillet would need to have an angled joint, as a vertical joint would prevent the wing from sliding back for removal. If you think of your typical wing assemblies with a front dowel locating arrangement into a forward bulkhead, the wing is pulled backwards and down to remove. I had allowed insufficient angle and no matter how hard I tried the two parts were held fast . Out came the ”Dremel”  and I sliced a bit off the fillet and the wing fell onto the bench. Roughly a 45 degree angle joint was now made to the front fillet and after the wing was bolted back into place, filler was applied to the gap so that it would only be stuck to the fuselage. The photo shows where the old joint would have been, indicated by the brown strip of light ply, which is the original jointing face of the middle fillet. But can you see the new butt joint?

You can now and although not a scale joint, once painted will hopefully be even more invisible .
.

This is how the front fillet looks on the wing and provides a perfect fairing around the Leading Edge, which the plans did not account for. I also have a perfect butt to the fuselage side.

And this is the arrangement on a full size FW190.
A few more odd jobs and then I hope to give the model it’s first coat of primer paint ….. soon?
The front fillet is fixed to the wing and for support I used several small pieces of 3/8” triangle balsa glued to the wing (note protective tape preventing any creeping glue sticking the fuselage to the wing).
Then it was covered with “Plastic Padding” and to strengthen the top lip from hanger rash “Microballons” were mixed into the paste. Once the filler had cured and sanded to the correct curvature, the wing was removed …… err no, not exactly, it was stuck fast
I had anticipated that the joint between the front and middle fillet would need to have an angled joint, as a vertical joint would prevent the wing from sliding back for removal. If you think of your typical wing assemblies with a front dowel locating arrangement into a forward bulkhead, the wing is pulled backwards and down to remove. I had allowed insufficient angle and no matter how hard I tried the two parts were held fast
and I sliced a bit off the fillet and the wing fell onto the bench. Roughly a 45 degree angle joint was now made to the front fillet and after the wing was bolted back into place, filler was applied to the gap so that it would only be stuck to the fuselage. The photo shows where the old joint would have been, indicated by the brown strip of light ply, which is the original jointing face of the middle fillet. But can you see the new butt joint? You can now and although not a scale joint, once painted will hopefully be even more invisible
This is how the front fillet looks on the wing and provides a perfect fairing around the Leading Edge, which the plans did not account for. I also have a perfect butt to the fuselage side.
And this is the arrangement on a full size FW190.
A few more odd jobs and then I hope to give the model it’s first coat of primer paint ….. soon?
Guest- Guest
Rich- Treasurer/Membership Secretary
- Posts : 4742
RDMFC Bonus points : 5694
Join date : 2008-11-18
Location : 53.3200°N, 3.4726°W -
Re: Focke Wulf 190 F4C 1/4 Scale
![]() by Mark Barnes 2010-06-02, 08:49
by Mark Barnes 2010-06-02, 08:49
Fantastic Richard, true work of art, this is why i dont consider myself a modeler.
Mark Barnes- Club Secretary
- Posts : 6607
RDMFC Bonus points : 8240
Join date : 2008-11-16
Location : Rhyl North Wales
Re: Focke Wulf 190 F4C 1/4 Scale
![]() by Guest 2010-06-03, 01:00
by Guest 2010-06-03, 01:00
Thanks for the comments  .
.
Richie at this moment in time I'm expecting AUW not to exceed 38 lbs, heavy Interestingly Vailly who produce the plans say 26lbs .... er having a laugh
  Everyone who has built one say they all come in at the 30lbs+ (depending on power source) and no-one has gone over 40lbs with the same spec as mine, so I should be safe from the 20kg limit. I did bag everything up and was 31lbs without paint and few small item. My 101" Stuka is 28lbs and floats very nicely but I'm not expecting the FW190 to float as well and will need some power on finals, which incidently puts the Rhyl field as not suitable
PS I have been experiencing broadband failure for the last couple of months and can only get on line late evening, so appologies for replies not being that fast. Mike Steed must be off work
Richie at this moment in time I'm expecting AUW not to exceed 38 lbs, heavy
PS I have been experiencing broadband failure for the last couple of months and can only get on line late evening, so appologies for replies not being that fast. Mike Steed must be off work
Guest- Guest
Page 4 of 7 • 1, 2, 3, 4, 5, 6, 7 ![]()
Page 4 of 7
Permissions in this forum:
You cannot reply to topics in this forum|
|
|
» Police crash
» Bit of indoors
» For Sale
» selling up finaly!