
Log in
Similar topics
Latest topics
Saturday 7/7/18
2018-07-07, 21:07 by Gary M Jones
I was at the field today between 14:00 & 15:00 all on my own , good flying too. There is a dead sheep along the fence line towards the gate from the pits, I saw the farmer so reported this to her. I hope no one had plans for a BBQ  .
.
Farmer …
Farmer …
Comments: 1
Focke Wulf 190 F4C 1/4 Scale
+4
Rich
Brian Colclough
Zaidy
Mark Barnes
8 posters
Page 1 of 7
Page 1 of 7 • 1, 2, 3, 4, 5, 6, 7 ![]()

Focke Wulf 190 F4C 1/4 Scale
![]() by Guest 2008-12-03, 11:36
by Guest 2008-12-03, 11:36
Well after finishing my 1/4 scale Junkers 87B2 "snake" stuka it was about time I started on my next project a 1/4 scale FW190. It has been in the planning for a number of years and most of the parts required have been collected and I have started on building the wings.
The FW190 has always been a favourite aircarft of mine, but not forgetting it's purpose and who it represented I still have to decide on the final "skin" but I do have a preference to model this FW190 A5 version.

The Focke-Wulf Fw 190 was widely regarded as Germany's best fighter. It was more than a match for the contemporary Spitfires. Shown is the FW-190 of Ost. Maj. Hermann Graf, France 1943. One of the highest decorated Luftwaffe aces.

The model will be scratch built to F4C scale standard from the plans Roy Vaillancourt (USA), which are a built -up structure drawn full size and includes the installation of flaps and sets of retracts including retracting tailwheel. The retracts are Roy's specially designed for the FW190. Full size templates are also shown for all ribs, formers and other various parts. For the scale purist Vailley Aviation have also shown scale construction for the ailerons, elevators and rudder. Accessory parts available include a fiberglass cowl, clear canopy, Aluminum spinner, dropable bomb or belly tank, scale retracts including retracting tail wheel, 5.50" dia scale wheels and functional engine cooling fan. All of which I have.
Primary construction is light plywood, balsa and spruce using conventional "tried and true" building techniques. All structures are built-up and either sheeted with 1/8 or 3/32 inch balsa. No foam is used whatsoever. A Moki 215cc radial will power the beast
The basic specification when completed are: 90.5" wing span, 76" length, 28-34lbs with a wing area of 1305 sq inches. Scale surafces detail, retracts, 6 cannons (non-working ), flaps and the Moki sound is
I shall post parts of the building process as and when something may be of interest, not a step by step build.
Tally ho.
The FW190 has always been a favourite aircarft of mine, but not forgetting it's purpose and who it represented
The Focke-Wulf Fw 190 was widely regarded as Germany's best fighter. It was more than a match for the contemporary Spitfires. Shown is the FW-190 of Ost. Maj. Hermann Graf, France 1943. One of the highest decorated Luftwaffe aces.
The model will be scratch built to F4C scale standard from the plans Roy Vaillancourt (USA), which are a built -up structure drawn full size and includes the installation of flaps and sets of retracts including retracting tailwheel. The retracts are Roy's specially designed for the FW190. Full size templates are also shown for all ribs, formers and other various parts. For the scale purist Vailley Aviation have also shown scale construction for the ailerons, elevators and rudder. Accessory parts available include a fiberglass cowl, clear canopy, Aluminum spinner, dropable bomb or belly tank, scale retracts including retracting tail wheel, 5.50" dia scale wheels and functional engine cooling fan. All of which I have.
Primary construction is light plywood, balsa and spruce using conventional "tried and true" building techniques. All structures are built-up and either sheeted with 1/8 or 3/32 inch balsa. No foam is used whatsoever. A Moki 215cc radial will power the beast
The basic specification when completed are: 90.5" wing span, 76" length, 28-34lbs with a wing area of 1305 sq inches. Scale surafces detail, retracts, 6 cannons (non-working
I shall post parts of the building process as and when something may be of interest, not a step by step build.
Tally ho.
Guest- Guest
Re: Focke Wulf 190 F4C 1/4 Scale
![]() by Mark Barnes 2008-12-06, 21:32
by Mark Barnes 2008-12-06, 21:32
Look forward to seeing this come together, Hopfully not as long a build as the stuka hey Richard, and the Moki for power will be awsome, Ive seen Ali`s 190 at close quarters many times with his Radial, hell the man even hovered it at the langer fly-in last year, not very scale but cool non the less
M
M

Mark Barnes- Club Secretary
- Posts : 6607
RDMFC Bonus points : 8240
Join date : 2008-11-16
Location : Rhyl North Wales
Re: Focke Wulf 190 F4C 1/4 Scale
![]() by Guest 2009-07-31, 22:19
by Guest 2009-07-31, 22:19
Well after some delay I've managed to get round to posting some of the wing construction. I've been heavily involved on a scale building manual for the guy's in the USA and although I didn't intend to make this a step by step guide to building the FW190, some points may be of interest with building in general any model aircraft.
Before starting .... plan ahead with "scratch building". It is best to start on the wings, as you will need them finished to complete the fuselage wing saddle correctly (wing incident and a tight fit ). You will also need the Stab finished after the wing for the same reason. The fin and rudder gets done last, as it can't be built and fitted correctly until the stab is in place. With a scale model you need precision or you will score very poorly on static scores during a competition. It is also easier to make and fine tune the ailerons to fit the wing, rather than the other way round. Sometimes people start off with the small things like ailerons or elevators when it would be prudent not to
https://2img.net/h/i389.photobucket.com/albums/oo336/RichardThomas01/FW190/IMG_1697.jpg
The bottom spar is placed on the plans. In the photo it is the one nearest to the leading edge. The other spar (it isn't but looks like one) is a spacer to raise the rear of each rib so that the washout at the wing tip is correct. Washout in basic is a twist in the wing which runs from the root rib to the wingtip causing the wing tip to be higher and it's trailing edge to be higher than the leading edge. This generates lift which is important at slow speeds, particular when landing approach to stop the aircraft from tip stalling. Next time your on a jet holiday look at the wing tip and see how much it is twisted During the build it is essential to keep things true, so use set squares and straight edges all the time.
The next photo is making sure we get a staright Leading Edge and Trailing Edge.
https://2img.net/h/i389.photobucket.com/albums/oo336/RichardThomas01/FW190/IMG_1699.jpg
Before starting .... plan ahead with "scratch building". It is best to start on the wings, as you will need them finished to complete the fuselage wing saddle correctly (wing incident and a tight fit
https://2img.net/h/i389.photobucket.com/albums/oo336/RichardThomas01/FW190/IMG_1697.jpg
The bottom spar is placed on the plans. In the photo it is the one nearest to the leading edge. The other spar (it isn't but looks like one) is a spacer to raise the rear of each rib so that the washout at the wing tip is correct. Washout in basic is a twist in the wing which runs from the root rib to the wingtip causing the wing tip to be higher and it's trailing edge to be higher than the leading edge. This generates lift which is important at slow speeds, particular when landing approach to stop the aircraft from tip stalling. Next time your on a jet holiday look at the wing tip and see how much it is twisted
The next photo is making sure we get a staright Leading Edge and Trailing Edge.
https://2img.net/h/i389.photobucket.com/albums/oo336/RichardThomas01/FW190/IMG_1699.jpg
Guest- Guest
Re: Focke Wulf 190 F4C 1/4 Scale
![]() by Guest 2009-07-31, 22:28
by Guest 2009-07-31, 22:28
Ooops be back when I've worked out whats happening with the photo's upload 
Guest- Guest


Re: Focke Wulf 190 F4C 1/4 Scale
![]() by Guest 2009-07-31, 22:58
by Guest 2009-07-31, 22:58

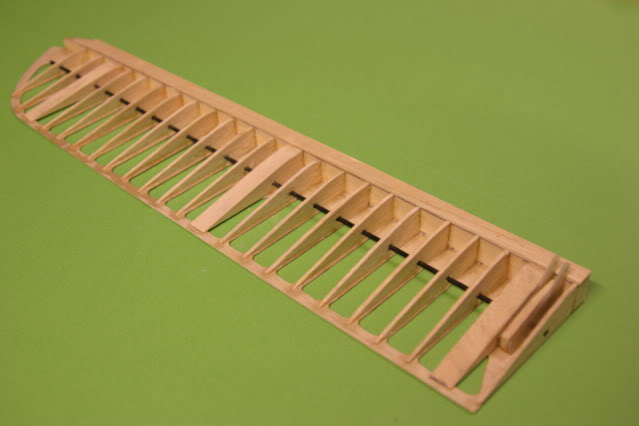
You will eventually end up with the wing looking like this in skeleton. If you look carefully you will see what appears to be a white tube runnning along the span of the wing just infront of the top spar and sticking out from the wing tip. This is a "plastruct" material tube and will facilitate the wires running to the wing tip navigation lights that we be fully functional when the model is finished. This isn't a detail shown on the plans and commonly is missing by plan designers. This sort of scale detail must be researched before building so that you can build it in as you go along. Try fitting the wiring after you have sheeted the wing
The square plates in the general centre area are the mounting positions for the aileron and flap servos.
Guest- Guest
Re: Focke Wulf 190 F4C 1/4 Scale
![]() by Guest 2009-07-31, 23:07
by Guest 2009-07-31, 23:07
Another useful tip is to use either very thin aircraft grade ply or my preferred option Proskin to strengthen the Trailing Edges. Proskin is a material similar to carbonfibre sheet but made out of fibreglass available from Mick Reeves Models. It is exteremly thin and very very light and strong. I could hit the work bench with the trailing edge and the workbench would come off alot worse Not only will it allow for a perfect straight and level Trailing edge, it will be hanger rash proof

It is hard to see in the proskin in the photo. This is the wing trailing edge position of the flap location. The proskin is sticking out 1/4" from the right and intended for the flap to rest on it when fitted.
It is hard to see in the proskin in the photo. This is the wing trailing edge position of the flap location. The proskin is sticking out 1/4" from the right and intended for the flap to rest on it when fitted.
Guest- Guest
Re: Focke Wulf 190 F4C 1/4 Scale
![]() by Guest 2009-07-31, 23:17
by Guest 2009-07-31, 23:17
Another detail often left of the builder of many a model is how best to run servo cables through the wings and the fuselage. One way is to tie them at various points, but if you ever need to replace the servo and can't get to the tied points you will have difficulty. I don't liker wires flapping loose to either come apart or chafe through causing a crash I like to use rolled paper tube which I make myself or you can use the card tube produced for small model rockets from hobby shops.

In this photo you will see the tube running between the servo mounting plates. I will explain how to make them next time. Bye for now.
In this photo you will see the tube running between the servo mounting plates. I will explain how to make them next time. Bye for now.
Guest- Guest
Re: Focke Wulf 190 F4C 1/4 Scale
![]() by Guest 2009-08-01, 21:12
by Guest 2009-08-01, 21:12
Nice bit of work there Richard. Well done. Posting pictures too Wooo....
Aeromdelling at it's best.
It will be interesting see see this project develop. The forum is good for this sort of thing.
The "Butcher Bird" is one of my favourites.
Somewhere I've got several booklets about them from colleague, Bill Entwhistle, a technical Author from Metrovicks Trafford Park. Bill came to work at ICI Blackley to write all the Manuals for the special one off dyestuff machines we made there. He gave me in particular, a copy of the FW190 pilot's notes that had been printed in book form for the Aircraft Book market. I will try and dig out the rest for you to see. They are in a box somewhere ..........here...............
Guest- Guest
Re: Focke Wulf 190 F4C 1/4 Scale
![]() by Guest 2009-08-01, 21:50
by Guest 2009-08-01, 21:50
Thanks Paul, now where would that box be ...... which shed or which room? 
I mentioned a procedure for making DIY paper tubes/conduits. This is how I do it:
This is a very simple method of constructing your own conduit of any length for either the wings or fuselage where access is restricted. It will stop the servo wires and any other cables from flying around and chafing resulting risk of signal failure to the servos. You can buy cardboard tubes from hobby shops intended for model rockets if you prefer.
Ideally you need the following materials:
Minimum 120gsm A3 size card paper, cling film, 13mm dowel, thin cyno (CA), protective surgeons gloves, scalpel and 24” ruler or other suitable straight edge.
I like to use A3 graph paper, which comes on an A3 pad of 30 sheets. The advantage of graph paper is that when it comes to cutting and rolling, the grid lines are invaluable guides.
Step1: Cut to the required length a piece of 13mm dowel (not expensive and available in 2m length’s from B&Q). It should be 6” longer than the total length of tube you wish to make. 13mm isn’t compulsory but I have found it to be suitable for running lots of cables. You can go down to 10mm but I wouldn’t recommend any smaller diameter.
Step 2. Roll two layers of cling film around the dowel. Important: You must not leave any wood exposed.
Step 3. Neatly cut 2” wide strips of A3 graph paper the longest length possible. The number of strips required will be dictated by step 4.

Step 4. Spiral roll the strips of paper along the dowel, so that you have a tube of the required length plus 2 “ extra, this extra will become clear later. You will need to trim both ends true, so add yet another extra 2” for this purpose. If you had cut the dowel 6” longer than the required tube length as suggested, you should now have 2” of exposed cling film covered dowel to hold onto.
The spiral overlaps should be approx 5mm. This is where graph paper comes into it’s own, as you will find out if trying to use plain paper card. The graph lines are an excellent guide. Important: The roll of paper should be a loose fit or you won’t be able to pull the dowel out later. I use a piece of cellotape to hold the loose end from unravelling at this point.
Step 5. Please wear rubber gloves at this stage. Thin CA runs through paper card at light speed and also drips off, so work over some old newspaper or your shoes laces will be stuck forever or worse soles glued to the carpet.
With care apply small doses of thin CA along the overlapping seems. It will self wick along the spiral seams if you hold the tube at an angle (and before you know it you’ve also glued it to your hands, hence the protective gloves. Been there, done that etc). It will dry very quickly.
A word of warning: I find CA “fumes” during this procedure so don’t breath it in or allow it to vapour into your eyes. Do it in a well ventilated area. As they say, read the manufacturer warnings/instruction for use of CA.
Step 6. Once dry, carefully pull the dowel out of the tube and trim the ends square with a scalpel. I do not cut the tube to the exact length required until it is installed in the model. Sometimes the ends gets knocked about as you thread it through the ribs or formers. You may find that some of the cling film remains inside the tube, this is not a matter for concern and can be left.
Step 7. Now dependant on strength of tube required, you can either leave it as it is or harden it by applying a flow coat of CA down the tube (I prefer the latter for tubes to be used with several cables). Surprisingly you will find that thin CA goes along way and not much will have been used out of a 2oz bottle.
You can now secure the tube in the model with medium CA at both ends. It normally isn’t necessary to glue it at every rib or former.
I mentioned a procedure for making DIY paper tubes/conduits. This is how I do it:
This is a very simple method of constructing your own conduit of any length for either the wings or fuselage where access is restricted. It will stop the servo wires and any other cables from flying around and chafing resulting risk of signal failure to the servos. You can buy cardboard tubes from hobby shops intended for model rockets if you prefer.
Ideally you need the following materials:
Minimum 120gsm A3 size card paper, cling film, 13mm dowel, thin cyno (CA), protective surgeons gloves, scalpel and 24” ruler or other suitable straight edge.
I like to use A3 graph paper, which comes on an A3 pad of 30 sheets. The advantage of graph paper is that when it comes to cutting and rolling, the grid lines are invaluable guides.
Step1: Cut to the required length a piece of 13mm dowel (not expensive and available in 2m length’s from B&Q). It should be 6” longer than the total length of tube you wish to make. 13mm isn’t compulsory but I have found it to be suitable for running lots of cables. You can go down to 10mm but I wouldn’t recommend any smaller diameter.
Step 2. Roll two layers of cling film around the dowel. Important: You must not leave any wood exposed.
Step 3. Neatly cut 2” wide strips of A3 graph paper the longest length possible. The number of strips required will be dictated by step 4.
Step 4. Spiral roll the strips of paper along the dowel, so that you have a tube of the required length plus 2 “ extra, this extra will become clear later. You will need to trim both ends true, so add yet another extra 2” for this purpose. If you had cut the dowel 6” longer than the required tube length as suggested, you should now have 2” of exposed cling film covered dowel to hold onto.
The spiral overlaps should be approx 5mm. This is where graph paper comes into it’s own, as you will find out if trying to use plain paper card. The graph lines are an excellent guide. Important: The roll of paper should be a loose fit or you won’t be able to pull the dowel out later. I use a piece of cellotape to hold the loose end from unravelling at this point.
Step 5. Please wear rubber gloves at this stage. Thin CA runs through paper card at light speed and also drips off, so work over some old newspaper or your shoes laces will be stuck forever or worse soles glued to the carpet.
With care apply small doses of thin CA along the overlapping seems. It will self wick along the spiral seams if you hold the tube at an angle (and before you know it you’ve also glued it to your hands, hence the protective gloves. Been there, done that etc). It will dry very quickly.
A word of warning: I find CA “fumes” during this procedure so don’t breath it in or allow it to vapour into your eyes. Do it in a well ventilated area. As they say, read the manufacturer warnings/instruction for use of CA.
Step 6. Once dry, carefully pull the dowel out of the tube and trim the ends square with a scalpel. I do not cut the tube to the exact length required until it is installed in the model. Sometimes the ends gets knocked about as you thread it through the ribs or formers. You may find that some of the cling film remains inside the tube, this is not a matter for concern and can be left.
Step 7. Now dependant on strength of tube required, you can either leave it as it is or harden it by applying a flow coat of CA down the tube (I prefer the latter for tubes to be used with several cables). Surprisingly you will find that thin CA goes along way and not much will have been used out of a 2oz bottle.
You can now secure the tube in the model with medium CA at both ends. It normally isn’t necessary to glue it at every rib or former.
Guest- Guest
Re: Focke Wulf 190 F4C 1/4 Scale
![]() by Mark Barnes 2009-08-03, 08:11
by Mark Barnes 2009-08-03, 08:11
Looks a tall order this build well out of my league, thanks for the update Richard
M
M
Mark Barnes- Club Secretary
- Posts : 6607
RDMFC Bonus points : 8240
Join date : 2008-11-16
Location : Rhyl North Wales
Re: Focke Wulf 190 F4C 1/4 Scale
![]() by Guest 2009-08-03, 22:01
by Guest 2009-08-03, 22:01
The art is it looks difficult, but when broken down into stages it actually isn't that difficult unless you have two left hands and rush things. A project like this takes about 2 years. Half to build and half to apply all the scale detail  If one man do it, so can another
Next on the construction was to set the servo mountings. I'm using brackets available from "Fighter Aces" in the UK and "Rocket City" fittings from club member Alan Hawes.

The brackets are fixed using blind nuts and can only be done before the sheeting skin is applied for obvious reasons.

Next on the construction was to set the servo mountings. I'm using brackets available from "Fighter Aces" in the UK and "Rocket City" fittings from club member Alan Hawes.
The brackets are fixed using blind nuts and can only be done before the sheeting skin is applied for obvious reasons.
Guest- Guest
Re: Focke Wulf 190 F4C 1/4 Scale
![]() by Guest 2009-08-03, 22:07
by Guest 2009-08-03, 22:07

I also need the servo positions to set the exit points to the flaps and alierons. If I built the flaps/ailerons first one may not be able to construct the servo brackets so that they line up within the wing

My next task will be to join both wings halfs together and plank the wings surface on one side.
Guest- Guest
Re: Focke Wulf 190 F4C 1/4 Scale
![]() by Guest 2009-08-03, 22:17
by Guest 2009-08-03, 22:17
Sometimes when joings two wings halves together it can be very difficult to get them square, particulary with alot of diheadral. Any model will fly true if flying surfaces are correctly aligned. You normally find this out on the maiden flight, when you start to dial in alot of trim. If you build true, very little if any trim adjustment is needed. My Stuka only required 2 clicks on elevator . A neat gadget that can be used to very good effect is a lazer line. They don't cost much and you can get them from B&Q with a spirit level built in them. Great for hangings wall cupboards etc in the kitchen too.
You should get the idea from the photo.

Next job is the wing skins.
You should get the idea from the photo.
Next job is the wing skins.
Guest- Guest
Re: Focke Wulf 190 F4C 1/4 Scale
![]() by Guest 2009-08-04, 22:18
by Guest 2009-08-04, 22:18
When skinning wings with sheet balsa one plank at a time you may find the joins don’t match, there is a gap, one plank is higher in one place than another, have difficulty getting the glue on the joints and pinning it down, it ripples over the rib positions, problems at dihedral joints and wing tips, need to cut at an angle around the leading edges etc. One plank is thicker than another etc etc etc. I’ve been asked many times how I get a flat wing surface. This is how I do it, not necessarily the only way but it does work.
Make a single wing skin before applying it to the wing frame. The advantages are that it prevents any of the above issues.
Use as large width planks (4” to 6” wide if appropriate. You can use standard 3” but for obvious reasons you may need more joints) of the same thickness that are of medium to soft density. Do not mix hard planks with soft ones, they will ripple at the joints if you’re not careful. Hard balsa is not necessary and causes ridges at joints with sweeping airfoils.
Step 1: Rough cut over long balsa sheets planks that will cover the wing.
Step 2: Use a straight edge and sharp scalpel and trim both sides of each plank so that they are true.
Step 3: Place on a smooth, flat and clean surface (nothing more annoying to find some debris damage the under surface later) and using approx 2” strips of Cellotape, tape the plank sides together tightly. I find that if you curl the one end of the tape over it’s self, it is easy to remove later on. Use some pressure to pull the edges tight together.

Step 4: Now run Cellotape down the full length of the joints. Do the same procedure for all the planks until you have a sheet the general shape of the wing. I use ordinary Cellotape as it sticks well but won’t damage the balsa when removed. Don’t use cheap or easy remove Cellotape … it doesn’t hold and it is very important that it does. In the photo I have used red tape to show how it should look (Cellotape doesn’t show up in a photo).

Step 5: Place the sheet over the wing and make sure that it overlaps all the wing. Add more if it doesn’t, not forgetting about the curve of the airfoil.
Make a single wing skin before applying it to the wing frame. The advantages are that it prevents any of the above issues.
Use as large width planks (4” to 6” wide if appropriate. You can use standard 3” but for obvious reasons you may need more joints) of the same thickness that are of medium to soft density. Do not mix hard planks with soft ones, they will ripple at the joints if you’re not careful. Hard balsa is not necessary and causes ridges at joints with sweeping airfoils.
Step 1: Rough cut over long balsa sheets planks that will cover the wing.
Step 2: Use a straight edge and sharp scalpel and trim both sides of each plank so that they are true.
Step 3: Place on a smooth, flat and clean surface (nothing more annoying to find some debris damage the under surface later) and using approx 2” strips of Cellotape, tape the plank sides together tightly. I find that if you curl the one end of the tape over it’s self, it is easy to remove later on. Use some pressure to pull the edges tight together.
Step 4: Now run Cellotape down the full length of the joints. Do the same procedure for all the planks until you have a sheet the general shape of the wing. I use ordinary Cellotape as it sticks well but won’t damage the balsa when removed. Don’t use cheap or easy remove Cellotape … it doesn’t hold and it is very important that it does. In the photo I have used red tape to show how it should look (Cellotape doesn’t show up in a photo).
Step 5: Place the sheet over the wing and make sure that it overlaps all the wing. Add more if it doesn’t, not forgetting about the curve of the airfoil.
Guest- Guest
Re: Focke Wulf 190 F4C 1/4 Scale
![]() by Guest 2009-08-04, 22:27
by Guest 2009-08-04, 22:27
Step 6: If happy, return the sheet to the work bench and check to make sure the Cellotape is well and truly stuck down, this is your last chance.
Step 7: Now turn the wing sheet over and drop it all expect the longest plank over the edge of the work bench. A heavy book is ideal to weigh the first plank down on top of the bench. You will now see that the top planks hinges open. The photo should give you the idea.

Step 8: Run glue along the joint. I use Aliphatic wood glue, NOT PVA glue. The former is easy to sand, while the latter although will sand is a much harder glue and can ridge at the joints which we don’t want.
Step 8: Now move the top plank across the work bench pulling Plank 2 up to where Plank 1 had been. Plank 3 will now be where Plank 2 had been if you follow . You now repeat the process until all the planks are back on the top of the table.
You will note that the excess glue (about 80% of what you had applied) has now been squeezed out of the joints. Wipe the excess off as you do each joint. It is important that the glue covers the whole length of a joint, so don’t skimp on applying glue. Glue can’t get under the sheet as the Cellotape hinge is stopping it (you did check that it was stuck down well? )
)
Step 9: You must weigh down the wing sheet while it dries. I use some books and plastic sheet to protect them. I normally leave it till the next day before doing step 10.
Step 10: Once glue has dried, turn over and remove all the Cellotape. It should peel off very easily without damaging the balsa. The Cellotape side is the top wing surface.
Step 11: Using 240 grit sand paper and block (ideally a 12” “T” bar sander), sand cross grain to achieve a perfect smooth surface. NOT down the grain length of the joint. There should not be any glue if you Cellotaped tight. What we are doing is removing those height imperfections between each plank and getting a perfect smooth surface.
Step 12: Now position the wing sheet over the wing frame and carefully tape (great stuff Cellotape ) into correct position. Then using a reliable pen (I use a biro, not felt tip as it runs in balsa) mark accurately the outline onto the wing sheet. Once your happy …. Measure twice, cut once as the saying goes remove the sheet from the wing.
Step 13: Over cut the outline by about 5mm. Do not cut exactly. The reason is we need excess for “hanger rash” that may occur while still constructing and some distortion of the edges on Step 14.
Step 14: Trial fit the sheet again to make sure it’s correct and then apply glue to all the parts that require it on the wing frame.
Step 15: Using our friend Cellotape, tape the wing into position. I do not use pins. Tape is best. It allows a wider pressure point without damaging the sheet. Leading and trailing edges, spars and ribs below, which can happen when blindly trying to skewer one with a pin and missing … hole, holes everywhere. It also provides a stretch over the airfoil keeping the sheet down on the ribs.
Job done. Repeat the process another 3 times and the whole wing is covered. When ready you can sand the edges down to the final finish. During my FW190 build I only covered one side of the wing at this stage, as I still need to add some detail = removable wing cannons, spent ammunition exit ports, pitot tube, retractable undercarriage fit, etc.
Next job will be to show a tip for joining ends of sheets together on compound curves for a perfect joint, i.e. centre joints and then I need to move onto the removable cannons.
Step 7: Now turn the wing sheet over and drop it all expect the longest plank over the edge of the work bench. A heavy book is ideal to weigh the first plank down on top of the bench. You will now see that the top planks hinges open. The photo should give you the idea.
Step 8: Run glue along the joint. I use Aliphatic wood glue, NOT PVA glue. The former is easy to sand, while the latter although will sand is a much harder glue and can ridge at the joints which we don’t want.
Step 8: Now move the top plank across the work bench pulling Plank 2 up to where Plank 1 had been. Plank 3 will now be where Plank 2 had been if you follow
You will note that the excess glue (about 80% of what you had applied) has now been squeezed out of the joints. Wipe the excess off as you do each joint. It is important that the glue covers the whole length of a joint, so don’t skimp on applying glue. Glue can’t get under the sheet as the Cellotape hinge is stopping it (you did check that it was stuck down well?
Step 9: You must weigh down the wing sheet while it dries. I use some books and plastic sheet to protect them. I normally leave it till the next day before doing step 10.
Step 10: Once glue has dried, turn over and remove all the Cellotape. It should peel off very easily without damaging the balsa. The Cellotape side is the top wing surface.
Step 11: Using 240 grit sand paper and block (ideally a 12” “T” bar sander), sand cross grain to achieve a perfect smooth surface. NOT down the grain length of the joint. There should not be any glue if you Cellotaped tight. What we are doing is removing those height imperfections between each plank and getting a perfect smooth surface.
Step 12: Now position the wing sheet over the wing frame and carefully tape (great stuff Cellotape
Step 13: Over cut the outline by about 5mm. Do not cut exactly. The reason is we need excess for “hanger rash” that may occur while still constructing and some distortion of the edges on Step 14.
Step 14: Trial fit the sheet again to make sure it’s correct and then apply glue to all the parts that require it on the wing frame.
Step 15: Using our friend Cellotape, tape the wing into position. I do not use pins. Tape is best. It allows a wider pressure point without damaging the sheet. Leading and trailing edges, spars and ribs below, which can happen when blindly trying to skewer one with a pin and missing … hole, holes everywhere. It also provides a stretch over the airfoil keeping the sheet down on the ribs.
Job done. Repeat the process another 3 times and the whole wing is covered. When ready you can sand the edges down to the final finish. During my FW190 build I only covered one side of the wing at this stage, as I still need to add some detail = removable wing cannons, spent ammunition exit ports, pitot tube, retractable undercarriage fit, etc.
Next job will be to show a tip for joining ends of sheets together on compound curves for a perfect joint, i.e. centre joints and then I need to move onto the removable cannons.
Guest- Guest
Re: Focke Wulf 190 F4C 1/4 Scale
![]() by Guest 2009-08-05, 15:05
by Guest 2009-08-05, 15:05
Trying to accurately butt joining sheeting, particularly at the centre wing joint with a compound curve can be difficult and it is generally important that this part of the wing is strong. It is after all a structural leaver point and we don’t want the wings folding up. Wing spar braces can be assisted by having a good sheet covering joint and this is how I go about it.
Firstly we must have one sheet in place with a “root straight edge” and normally glued down onto the contour of Rib #1. Next dry fit the butt joining sheet and you will normally find that there is a gap along the centre part of the butt joint which diminishes the closer you get to the Leading and Trailing Edges.
Using a pencil compass, find the widest part of the gap and extend the compass to be greater this distance by approximately 3mm.

Now run the metal spike along the entire straight edge of the glued down sheet. The pencil line drawn on the butting sheet will then mirror exactly the straight edge. It will be wide as the gap at the Leading and Trailing Edge, reducing where the gap is the widest.
Now carefully cut the butt sheet waste and it maybe necessary to angle the blade for a good joint to apply glue. You can use this same method for many other applications where butt joints are required, not just wings, such as cowls, canopies, stabs and fuselage sheeting.

Guest- Guest
Re: Focke Wulf 190 F4C 1/4 Scale
![]() by Guest 2009-08-05, 19:06
by Guest 2009-08-05, 19:06
Next on the to do list (actually did it before sheeting one side of the wing) is the fitting of the wing cannons. Time consuming process, as accuracy is essential. The FW190 had either 2 or 4 wing cannons dependent on the mark and role of operations. I have gone for the four cannon variant.
The dihedral of the wing also caused some problems, as on the scale drawings all four cannons are from a front view nearly level with each other. The outer cannons requiring to be positioned near the bottom edge of the leading Edge to achieve this. This is scale and the sort of thing judges look at to try and down mark your scores. The Leading Edge is also swept back making marking and drilling difficult. Also they all need to be pointing parallel in 3 planes (front, side and plan view), more marks lost if wrong. To compound the accuracy they extend a long way out of the wing and the outer cannons are longer than the inboards and there is a Pitot Tube at one wing tip also to be lined up. Only one cannon needed to be a fraction of a degree out and they would easily be seen pointing in the wrong direction and it would make a mess of the Leading Edge to rectify. To compound it even further, if I didn’t already have enough to worry about, they needed to be removable as they can easily be damaged in transit to events.
First task was to make the cannons themselves. I’ve used 8mm aluminium tube (B&Q to the rescue again ). Scaled them to the plans, which doesn’t have this detail shown and not uncommon practise by model designers . I then cut the tubes to the required lengths.
Next was to make them removable but secure when fitted. I hope the photo gives some explanation. This is the kit that I made for all four cannons and I used the same process for the Pitot Tube but on a smaller scale.

At the bottom of the photo is a completed cannon with it’s white plastic outer guide.
Each is made by using a square of 6mm light ply with a centre hole the size of the nylon bolt (nylon won’t normally vibrate loose when tightened and for the weight conscious, lighter than metal). An identical piece of light ply then has a centre cavity made using a Forstner bit the same diameter as a captive nut, which has the same size thread as the nylon bolt.
The captive nut is then sandwiched using thin CA glue making sure none gets onto the threads. This is the rear most mounting for the cannon and is glued in the correct position within the wing. I did it near the wing spar and made reinforced braces as it mustn’t come loose and you won’t be able to get to it again.

I then cut the nylon bolt in half and discarded the flat head. It was the same size as the internal diameter of the aluminium tube (lucky) and slid inside so that only enough was showing that would allow the cannon to screw tight to the captive nut without bottoming on the back of the captive nut mounting.
The last thing I wanted was for the bolt to stay stuck in the mounting when I unscrewed the cannon, so a hole was crossed drilled, pinned and wicked with plenty of thin CA glue. Now when all is done, trying to find the mounting in the sealed wing, wiggling a length of tube approx. 8” long can be very frustrating to line up. So a length of “Plastruct Tube” which the cannon slides down was made as a guide and is glued in place between the mounting and the leading edge and problem solved.

The dihedral of the wing also caused some problems, as on the scale drawings all four cannons are from a front view nearly level with each other. The outer cannons requiring to be positioned near the bottom edge of the leading Edge to achieve this. This is scale and the sort of thing judges look at to try and down mark your scores. The Leading Edge is also swept back making marking and drilling difficult. Also they all need to be pointing parallel in 3 planes (front, side and plan view), more marks lost if wrong. To compound the accuracy they extend a long way out of the wing and the outer cannons are longer than the inboards and there is a Pitot Tube at one wing tip also to be lined up. Only one cannon needed to be a fraction of a degree out and they would easily be seen pointing in the wrong direction and it would make a mess of the Leading Edge to rectify. To compound it even further, if I didn’t already have enough to worry about, they needed to be removable as they can easily be damaged in transit to events.
First task was to make the cannons themselves. I’ve used 8mm aluminium tube (B&Q to the rescue again
Next was to make them removable but secure when fitted. I hope the photo gives some explanation. This is the kit that I made for all four cannons and I used the same process for the Pitot Tube but on a smaller scale.
At the bottom of the photo is a completed cannon with it’s white plastic outer guide.
Each is made by using a square of 6mm light ply with a centre hole the size of the nylon bolt (nylon won’t normally vibrate loose when tightened and for the weight conscious, lighter than metal). An identical piece of light ply then has a centre cavity made using a Forstner bit the same diameter as a captive nut, which has the same size thread as the nylon bolt.
The captive nut is then sandwiched using thin CA glue making sure none gets onto the threads. This is the rear most mounting for the cannon and is glued in the correct position within the wing. I did it near the wing spar and made reinforced braces as it mustn’t come loose and you won’t be able to get to it again.
I then cut the nylon bolt in half and discarded the flat head. It was the same size as the internal diameter of the aluminium tube (lucky) and slid inside so that only enough was showing that would allow the cannon to screw tight to the captive nut without bottoming on the back of the captive nut mounting.
The last thing I wanted was for the bolt to stay stuck in the mounting when I unscrewed the cannon, so a hole was crossed drilled, pinned and wicked with plenty of thin CA glue. Now when all is done, trying to find the mounting in the sealed wing, wiggling a length of tube approx. 8” long can be very frustrating to line up. So a length of “Plastruct Tube” which the cannon slides down was made as a guide and is glued in place between the mounting and the leading edge and problem solved.
Guest- Guest
Re: Focke Wulf 190 F4C 1/4 Scale
![]() by Guest 2009-08-05, 19:10
by Guest 2009-08-05, 19:10
The next problem was drilling the leading edges. By chance years ago I learnt of a better way to construct Leading Edges and joining wing sheeting to it (I may comeback to explaining this technique later if members want  ) and this came to the fore with helping me with the cannon positions.
With only half the Leading Edge built any errors would be hidden by the outer Leading Edge later fitted. It allowed me to mark the position of the cannons as accurately as possible and drill the holes. I then fine-tuned the angle of the cannons so that they were all parallel and pointing in the correct direction.
Once I had it all lined up, fitting the outer Leading Edge with a clean hole, was simple by using an over size piece of Leading Edge and drilling the cannon hole in it to the correct angle for the sweep back using a pillar drill.

Then using a set square, position it onto the wing, using the cannon as a guide. Mark around the back of the Leading Edge the wing shape, remove and cut the waste.

Glue back into place and sand Leading Edge to finial shape. The hole was then bunged to prevent any foreign matter getting into it. Still have to glass cloth cover, sand, scale detail and paint to go … phew when will it be finished?
I seem to have lost my photo of the finished set up, but this one from another modeller shows how it would look. He also has used the two-part Leading Edge procedure waiting for final sanding.

Hope you all have a good time at the Rhyl Airshow and club Aero-Tow. I will be away this weekend competing in the Scottish Scale Championships at Castle Kennedy.
With only half the Leading Edge built any errors would be hidden by the outer Leading Edge later fitted. It allowed me to mark the position of the cannons as accurately as possible and drill the holes. I then fine-tuned the angle of the cannons so that they were all parallel and pointing in the correct direction.
Once I had it all lined up, fitting the outer Leading Edge with a clean hole, was simple by using an over size piece of Leading Edge and drilling the cannon hole in it to the correct angle for the sweep back using a pillar drill.
Then using a set square, position it onto the wing, using the cannon as a guide. Mark around the back of the Leading Edge the wing shape, remove and cut the waste.
Glue back into place and sand Leading Edge to finial shape. The hole was then bunged to prevent any foreign matter getting into it. Still have to glass cloth cover, sand, scale detail and paint to go … phew when will it be finished?
I seem to have lost my photo of the finished set up, but this one from another modeller shows how it would look. He also has used the two-part Leading Edge procedure waiting for final sanding.
Hope you all have a good time at the Rhyl Airshow and club Aero-Tow. I will be away this weekend competing in the Scottish Scale Championships at Castle Kennedy.
Guest- Guest
Re: Focke Wulf 190 F4C 1/4 Scale
![]() by Guest 2009-08-14, 19:45
by Guest 2009-08-14, 19:45
Flaps are next and a deviation from the plans, which frankly were not to “scale” and the designer later recognised need to strengthen and has since suggested increasing the number of ribs.
The skin surfaces were replaced with Proskin with a rib configuration of more scale appearance and a scale step at the trailing edge using carbon fibre strip. These are the parts required.

Proskin is a super material extremely tough, very thin and lightweight. It is not as expensive and in a raw state not as brittle as carbon fibre. So tough that trying to sand it wears out the sanding material very fast and sparks fly on a disc sander.
Sheet of the required size is marked with rib positions and openings that need to be cut out. Each cut out was done by drilling 4 large holes with a “Forstner bit” in a pillar drill and then squaring with a Dremel/Perma-Grit round sanding bit. One mistake and the whole piece would be thrown away. The photo’s shows the various stages of removing the cut outs and final surfaces for one flap.


The balsa leading edge and ribs are then glued and a carbon strip makes a step. Servo horn was another deviation from the plans using G10 material and allows for the servo operation to be hidden from view and is “scale” (no unsightly horns sticking out). Extensions for Robart pin hinges to glue into are then mounted in the scale position (more static marks lost if not correct).

The top panel with the cut outs is then glued and weighed down till dry. This panel is actually the inside surface of the flap and only visible when the flaps are deployed and needs to be exactly flat.


The Leading Edge is bevelled in one direction only and the Robart pin hinges dry fitted (not glued until after it has been painted).
You may also note that the ends of the flaps are not closed and is also “scale”, another detail on the plans that incorrectly showed it blanked off by a rib.
As will be seen with the Aileron and Elevator pin hinges, the Flaps hinges need to have an extension fitted on one side. The pivot point is not in the centre of the gap between the fixed and moving surface but offset into the leading edge of the moving surface and is “scale”.

Its worth mentioning to anyone wanting to build a scale model that it is prudent to do a lot of research on “scale detail” before putting a scalpel to work. I find re-writing all over the plans is a good way to keep track of what is wrong and needs modification during the build, I doubt if you’ll remember it over a year or so of construction.
The skin surfaces were replaced with Proskin with a rib configuration of more scale appearance and a scale step at the trailing edge using carbon fibre strip. These are the parts required.
Proskin is a super material extremely tough, very thin and lightweight. It is not as expensive and in a raw state not as brittle as carbon fibre. So tough that trying to sand it wears out the sanding material very fast and sparks fly on a disc sander.
Sheet of the required size is marked with rib positions and openings that need to be cut out. Each cut out was done by drilling 4 large holes with a “Forstner bit” in a pillar drill and then squaring with a Dremel/Perma-Grit round sanding bit. One mistake and the whole piece would be thrown away. The photo’s shows the various stages of removing the cut outs and final surfaces for one flap.
The balsa leading edge and ribs are then glued and a carbon strip makes a step. Servo horn was another deviation from the plans using G10 material and allows for the servo operation to be hidden from view and is “scale” (no unsightly horns sticking out). Extensions for Robart pin hinges to glue into are then mounted in the scale position (more static marks lost if not correct).
The top panel with the cut outs is then glued and weighed down till dry. This panel is actually the inside surface of the flap and only visible when the flaps are deployed and needs to be exactly flat.
The Leading Edge is bevelled in one direction only and the Robart pin hinges dry fitted (not glued until after it has been painted).
You may also note that the ends of the flaps are not closed and is also “scale”, another detail on the plans that incorrectly showed it blanked off by a rib.
As will be seen with the Aileron and Elevator pin hinges, the Flaps hinges need to have an extension fitted on one side. The pivot point is not in the centre of the gap between the fixed and moving surface but offset into the leading edge of the moving surface and is “scale”.
Its worth mentioning to anyone wanting to build a scale model that it is prudent to do a lot of research on “scale detail” before putting a scalpel to work. I find re-writing all over the plans is a good way to keep track of what is wrong and needs modification during the build, I doubt if you’ll remember it over a year or so of construction.
Guest- Guest
Re: Focke Wulf 190 F4C 1/4 Scale
![]() by Guest 2009-08-19, 20:11
by Guest 2009-08-19, 20:11
Ailerons on the FW190 are fabric-covered frames with pinked tape over rib stitching (same goes for the elevators and rudder). A couple of deviations from the plans necessitated the use of G10 twin aileron horns (scale detail) and a carbon rod was inserted span wise to give more strength as the horn is positioned at the extreme end of the aileron.


The top and bottom surfaces are marked out on aircraft ply and then the cut outs are removed using a scalpel and our Dremel with a router bit. Accuracy is essential with the cut outs (a repetitive fun job?), as the ribs fit under the strips between the cut outs which are only just wider. When it comes to putting the surface on top, any error will show an exposed rib.

All the parts are then glued in place on the bottom surface.
The top surface is glued, leading edge shaped and scale cut outs for the Robart pin hinges (dry fit at this stage, glued after Ailerons painted).

To achieve a straight trailing edge I always use a straight edge and clamp it down on the edge of the work bench till the glue dries. In this photo the process is being used on an elevator. Works every time and can be used on the wings as well as any moving surfaces.

Now it’s time to cover the ailerons with fabric. I used Solatex iron on covering which has a scale appearance. Once this was done I then needed to add the simulated rib stitching. I achieved this by applying droplets of PVA glue watered down 50% and an oil lubricating squeeze bottle used by model train engineers. Once they had dried rib stitching with scale TPI (pinked edging) tape from the USA was ironed over and along the edges. This produced the scale appearance that I wanted.


The next task was to scale finish the aileron horn.
The top and bottom surfaces are marked out on aircraft ply and then the cut outs are removed using a scalpel and our Dremel with a router bit. Accuracy is essential with the cut outs (a repetitive fun job?), as the ribs fit under the strips between the cut outs which are only just wider. When it comes to putting the surface on top, any error will show an exposed rib.
All the parts are then glued in place on the bottom surface.
The top surface is glued, leading edge shaped and scale cut outs for the Robart pin hinges (dry fit at this stage, glued after Ailerons painted).
To achieve a straight trailing edge I always use a straight edge and clamp it down on the edge of the work bench till the glue dries. In this photo the process is being used on an elevator. Works every time and can be used on the wings as well as any moving surfaces.
Now it’s time to cover the ailerons with fabric. I used Solatex iron on covering which has a scale appearance. Once this was done I then needed to add the simulated rib stitching. I achieved this by applying droplets of PVA glue watered down 50% and an oil lubricating squeeze bottle used by model train engineers. Once they had dried rib stitching with scale TPI (pinked edging) tape from the USA was ironed over and along the edges. This produced the scale appearance that I wanted.
The next task was to scale finish the aileron horn.
Guest- Guest
Re: Focke Wulf 190 F4C 1/4 Scale
![]() by Guest 2009-08-20, 08:01
by Guest 2009-08-20, 08:01
Rich T I am very impressed with all the detail and patience,a credit to your bulibing skills.
Guest- Guest
Re: Focke Wulf 190 F4C 1/4 Scale
![]() by Guest 2009-08-20, 08:05
by Guest 2009-08-20, 08:05
building ..........not what a put.My youngest grandson (10 months) was distracting me
Guest- Guest
Page 1 of 7 • 1, 2, 3, 4, 5, 6, 7 ![]()
Page 1 of 7
Permissions in this forum:
You cannot reply to topics in this forum|
|
|
» Police crash
» Bit of indoors
» For Sale
» selling up finaly!