
Log in
Similar topics
Latest topics
Saturday 7/7/18
2018-07-07, 21:07 by Gary M Jones
I was at the field today between 14:00 & 15:00 all on my own , good flying too. There is a dead sheep along the fence line towards the gate from the pits, I saw the farmer so reported this to her. I hope no one had plans for a BBQ  .
.
Farmer …
Farmer …
Comments: 1
New 250 pro build.
+2
Rich
Andy Sayle
6 posters
Page 1 of 2
Page 1 of 2 • 1, 2 ![]()

New 250 pro build.
![]() by Guest 2012-02-08, 16:40
by Guest 2012-02-08, 16:40
Ok so the new trex 250 pro just came out last week,and as they've tweaked and improved things,namely the tail I thought I'd get one together and see how things have changed.
First up a couple of pictures of the box,


I'll be starting the build in about a week because at the moment I'm building an avant aurora for someone,so there's about a week left on that.
To start things rolling I thought I'd point out the main changes over the last 250se.
First thing that catches the eye is the new canopy,a very nice paint job and it feels very strong.
The frames now have moulded plastic inserts in the carbon around where the servos secure to the frames.This is a cracking idea as you'll be able to fit the servos without trying to hold a backing nut on the lugs while you fiddle with the servo screws.
The main rotor head has been redesigned for a lower c of g and better efficiency.I don't know how much of a difference this will make in flight but it looks nice,so off to a good start.
One of the best improvements is the now metal anti rotation bracket.This also uses metal canopy mounts and was previously essential to upgrade on the last model.
Stronger landing gear apparently.Looks identical to be honest but maybe they've used better materials.
The most important tweak has to be the new single piece tail rotor.Previously the design left the model with far too much mechanical gain.This meant a high headspeed would leave the tail spinning around 15,000 rpm,and you had to run an incredibly low gyro gain.The only way to help it was to drill a new hold very near to the centre of the servo horn and run much shorter tail blades.Even then only the absolute best gyros and tail servos could keep it in check.
The new tail hopefully will improve things and they also added the Chinese tail blade grip mod which hopefully will work better.
The battery tray is a bit longer making it harder to bend your lipos in a hard crash.
The last tweak that I'm not sure about is that they've built a carbon tail servo/gyro mount that slots in between the back of the frame.
I'm not sure why they did this because it takes up space in an already cramped frame.
Also it means you have to use a sub micro tail servo,so if the tail doesn't work well I'll have to figure a boom mounted mini servo out.But if it works then it'll look nice and clean.
Align have only released the super combo version which comes with all the electrics.
The last 250 I built was the bare bones kit,so I could pick my own electrics,but I called fast lad to ask if they'd pull the align gyro out and let me pick a spartan quark,my favourite gyro which they said yes to.

I didn't want to use the align 790 gyro because it's relatively big so it will take up a lot of frame space.Also the wires are around 12 inches long so they also take up a lot of space.
There's a few upgrades that should arrive in the next week,so I'll post some pics when they get here and explain why they're needed.
I'm gonna do everything possible to keep all the wiring hidden between the frames so expect some blood,sweat and tears with this one.
Danny.
First up a couple of pictures of the box,
I'll be starting the build in about a week because at the moment I'm building an avant aurora for someone,so there's about a week left on that.
To start things rolling I thought I'd point out the main changes over the last 250se.
First thing that catches the eye is the new canopy,a very nice paint job and it feels very strong.
The frames now have moulded plastic inserts in the carbon around where the servos secure to the frames.This is a cracking idea as you'll be able to fit the servos without trying to hold a backing nut on the lugs while you fiddle with the servo screws.
The main rotor head has been redesigned for a lower c of g and better efficiency.I don't know how much of a difference this will make in flight but it looks nice,so off to a good start.
One of the best improvements is the now metal anti rotation bracket.This also uses metal canopy mounts and was previously essential to upgrade on the last model.
Stronger landing gear apparently.Looks identical to be honest but maybe they've used better materials.
The most important tweak has to be the new single piece tail rotor.Previously the design left the model with far too much mechanical gain.This meant a high headspeed would leave the tail spinning around 15,000 rpm,and you had to run an incredibly low gyro gain.The only way to help it was to drill a new hold very near to the centre of the servo horn and run much shorter tail blades.Even then only the absolute best gyros and tail servos could keep it in check.
The new tail hopefully will improve things and they also added the Chinese tail blade grip mod which hopefully will work better.
The battery tray is a bit longer making it harder to bend your lipos in a hard crash.
The last tweak that I'm not sure about is that they've built a carbon tail servo/gyro mount that slots in between the back of the frame.
I'm not sure why they did this because it takes up space in an already cramped frame.
Also it means you have to use a sub micro tail servo,so if the tail doesn't work well I'll have to figure a boom mounted mini servo out.But if it works then it'll look nice and clean.
Align have only released the super combo version which comes with all the electrics.
The last 250 I built was the bare bones kit,so I could pick my own electrics,but I called fast lad to ask if they'd pull the align gyro out and let me pick a spartan quark,my favourite gyro which they said yes to.
I didn't want to use the align 790 gyro because it's relatively big so it will take up a lot of frame space.Also the wires are around 12 inches long so they also take up a lot of space.
There's a few upgrades that should arrive in the next week,so I'll post some pics when they get here and explain why they're needed.
I'm gonna do everything possible to keep all the wiring hidden between the frames so expect some blood,sweat and tears with this one.
Danny.
Guest- Guest
Re: New 250 pro build.
![]() by Guest 2012-02-15, 15:54
by Guest 2012-02-15, 15:54
Small update as the upgrades have arrived.
First thing is a canomod the rock canopy.Ive picked this because the nose is much rounder than the pointy stock one.Hopefully this will allow enough battery room for Hyperion 900 packs to fit.Ive only ordered one to see if it fits,if it doesn't then I'll go with thunder power 65c packs.
Also in the first picture is the rc screws stainless steel screw kit.The standard screws in the 250 are made by Cadbury so these are a must.

Next up is the receiver.Just a Spektrum 6115e for much smallness,and an Integy 0.9mm driver.Again a must have for the tiny grub screws on things like the landing gear.

Next is a Kevlar belt because the stock one starts to fail quite quickly on these.
Another must have is this pinion from extreme.They still use the "glue the pinion on the motor"method which I hate,so the extreme one can be glued on,followed by a grub screw to hold it in place.Much better.
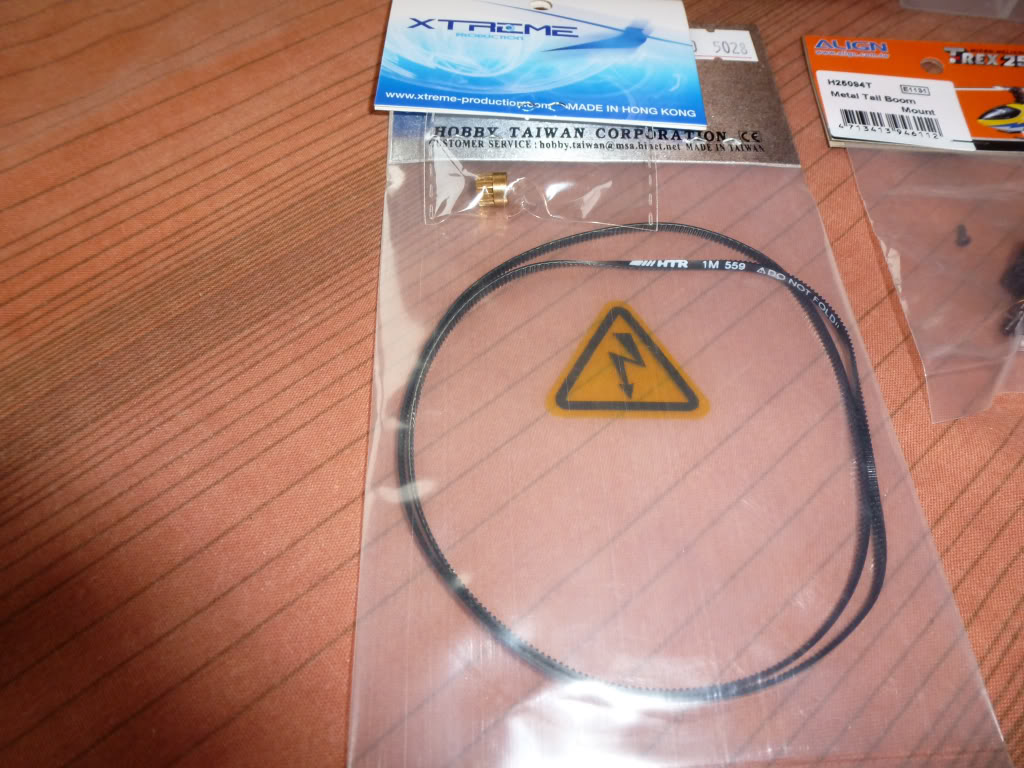
Last 3 upgrades are the Align metal tail pitch control arm.Not strictly necessary but it will make for a slop free tail.
The Align metal boom support block is better than the plastic one and should clamp the boom down nice.
Finally the metal main shaft bearing blocks for a more rigid construction.Obviously these add a little extra bling which is always nice.
Hopefully the build should comense in T-minus 3 days once this Avant is finished and I'm looking forward to the fiddly stress of it all.
Danny.
First thing is a canomod the rock canopy.Ive picked this because the nose is much rounder than the pointy stock one.Hopefully this will allow enough battery room for Hyperion 900 packs to fit.Ive only ordered one to see if it fits,if it doesn't then I'll go with thunder power 65c packs.
Also in the first picture is the rc screws stainless steel screw kit.The standard screws in the 250 are made by Cadbury so these are a must.
Next up is the receiver.Just a Spektrum 6115e for much smallness,and an Integy 0.9mm driver.Again a must have for the tiny grub screws on things like the landing gear.
Next is a Kevlar belt because the stock one starts to fail quite quickly on these.
Another must have is this pinion from extreme.They still use the "glue the pinion on the motor"method which I hate,so the extreme one can be glued on,followed by a grub screw to hold it in place.Much better.
Last 3 upgrades are the Align metal tail pitch control arm.Not strictly necessary but it will make for a slop free tail.
The Align metal boom support block is better than the plastic one and should clamp the boom down nice.
Finally the metal main shaft bearing blocks for a more rigid construction.Obviously these add a little extra bling which is always nice.
Hopefully the build should comense in T-minus 3 days once this Avant is finished and I'm looking forward to the fiddly stress of it all.
Danny.
Guest- Guest
Re: New 250 pro build.
![]() by Guest 2012-02-15, 15:57
by Guest 2012-02-15, 15:57
Bugger I messed up the pictures.

This is the canopy.

Danny.
This is the canopy.
Danny.
Guest- Guest
Re: New 250 pro build.
![]() by Guest 2012-02-17, 17:48
by Guest 2012-02-17, 17:48
Okay today I've started to build this 250.I forgot how tiny these things are.
Opening the first bag you're greeted with the head ready built.All screws are loose so it all needs tearing down and everything thread locking.
Here is the head out of the box.

Here is the majority of the tools needed for most of the build.

When you open the little tool bag that comes supplied with the kit there is a 1.3 mm Allan driver.This needs throwing away because the Align screws are very soft and aren't quite the correct size.
In the picture is the tool I use instead.A Hudy 0.050 imperial driver which fits perfect and in guaranteed for life.
Here's the head thread locked with flybar fitted.

Most of the links are fixed in size so it takes all of the guesswork out of fitting them.Also they are extremely free and didn't need to get the ball link reamer out for them.Even if you have a couple of tight links though I wouldn't recommend trying to ream them because they are just too fragile and small.
Here's the head finished with paddles.

Something worth mentioning is the main shaft.
On the previous 250 there used to be a collar that went on the main shaft with a tiny grub screw that used to strip really easy.They were made of very soft aluminium and really needed replacing everytime you removed the head.
Not anymore,woohoo.Now there is a shoulder on the main shaft which just lets you slide it through the bearing blocks,if there is any up and down play you just use a shim in there.Much better.
All done for the day.Tomorrow it'll be onto page 9 for servo install after the carbon has been sanded and sealed.
Danny.
Opening the first bag you're greeted with the head ready built.All screws are loose so it all needs tearing down and everything thread locking.
Here is the head out of the box.
Here is the majority of the tools needed for most of the build.
When you open the little tool bag that comes supplied with the kit there is a 1.3 mm Allan driver.This needs throwing away because the Align screws are very soft and aren't quite the correct size.
In the picture is the tool I use instead.A Hudy 0.050 imperial driver which fits perfect and in guaranteed for life.
Here's the head thread locked with flybar fitted.
Most of the links are fixed in size so it takes all of the guesswork out of fitting them.Also they are extremely free and didn't need to get the ball link reamer out for them.Even if you have a couple of tight links though I wouldn't recommend trying to ream them because they are just too fragile and small.
Here's the head finished with paddles.
Something worth mentioning is the main shaft.
On the previous 250 there used to be a collar that went on the main shaft with a tiny grub screw that used to strip really easy.They were made of very soft aluminium and really needed replacing everytime you removed the head.
Not anymore,woohoo.Now there is a shoulder on the main shaft which just lets you slide it through the bearing blocks,if there is any up and down play you just use a shim in there.Much better.
All done for the day.Tomorrow it'll be onto page 9 for servo install after the carbon has been sanded and sealed.
Danny.
Guest- Guest
Re: New 250 pro build.
![]() by Guest 2012-02-19, 18:03
by Guest 2012-02-19, 18:03
Yesterday was a bit tedious.a few hours just removing all the kit screws and laying out all the stainless ones into little groups.

Then the frame pieces were sanded and nail polish used on the edges before building them back up.

Upper frames then assembled and the cyclic servos installed.

Lower frames built and tail servo and motor fitted.


More updates later while I try sorting the wiring.
Then the frame pieces were sanded and nail polish used on the edges before building them back up.
Upper frames then assembled and the cyclic servos installed.
Lower frames built and tail servo and motor fitted.
More updates later while I try sorting the wiring.
Guest- Guest
Re: New 250 pro build.
![]() by Andy Sayle 2012-02-19, 20:22
by Andy Sayle 2012-02-19, 20:22
Is that a carrot at the bottom of the last photo, or is it something far more sinister?!
Nice build by the way, I quite fancy a little chopper....
Nice build by the way, I quite fancy a little chopper....

Andy Sayle- Club Chairman
- Posts : 4738
RDMFC Bonus points : -487569788
Join date : 2008-11-16
Location : Abergele, North Wales
Re: New 250 pro build.
![]() by Rich 2012-02-19, 20:29
by Rich 2012-02-19, 20:29
far more "sinister" the yellow handle of a pair of pliers

Rich- Treasurer/Membership Secretary
- Posts : 4742
RDMFC Bonus points : 5694
Join date : 2008-11-18
Location : 53.3200°N, 3.4726°W -

Re: New 250 pro build.
![]() by Guest 2012-02-20, 00:38
by Guest 2012-02-20, 00:38
Cheers Andy.yeah they're pretty cool and parts and upgrades are much much cheaper than a 450 or 500.
If you've got the urge go for it.
Richie,them pliers are orange.Its the red towel making them look a bit yellow.Theyre so old now I should probably bin them.
If you've got the urge go for it.
Richie,them pliers are orange.Its the red towel making them look a bit yellow.Theyre so old now I should probably bin them.
Guest- Guest
Re: New 250 pro build.
![]() by Guest 2012-02-20, 00:57
by Guest 2012-02-20, 00:57
Well I've just finished for the night after a whole evening trying to keep all the electrics in the frames.
According to the instructions you put the gyro upside down under the mounting plate at the back that holds the tail servo.
This would leave no options on where to put the receiver,so it would have to mount outside the frames.
I found a tiny bit of space above this gyro plate where the spartan would fit,just.
So I mounted it there and installed the main gear to check for clearance but it was touching the main gear.
A backup plan was needed so I removed the 4mm gyro mounting tape and replaced it with 1mm tape and it just about clears.Yay.
This means the gyro is mounted almost rigid but should be fine as long as there's no vibrations.
Here's a pick of where I hid the gyro.

Now seeing as I managed to leave the lower gyro mounting area clear I squeezed the receiver in there under the gyro.
Here's a pic.

Next it was time to start wiring everything up.I started at the front with the aileron and pitch servo wires,trying to keep them clear of the motor.
NOTE ABOUT THE MOTOR.
Before inserting the front servos and any wiring,fit the main gear,head and motor.This is the best time to set gear mesh.Then remove them and remove the motor with its mount.The mesh will stay the same.
Here's a pick of the servo wires near the motor.I had to cable tie them straight to the frame without heat shrinking them first because room is so tight.

According to the instructions you put the gyro upside down under the mounting plate at the back that holds the tail servo.
This would leave no options on where to put the receiver,so it would have to mount outside the frames.
I found a tiny bit of space above this gyro plate where the spartan would fit,just.
So I mounted it there and installed the main gear to check for clearance but it was touching the main gear.
A backup plan was needed so I removed the 4mm gyro mounting tape and replaced it with 1mm tape and it just about clears.Yay.
This means the gyro is mounted almost rigid but should be fine as long as there's no vibrations.
Here's a pick of where I hid the gyro.
Now seeing as I managed to leave the lower gyro mounting area clear I squeezed the receiver in there under the gyro.
Here's a pic.
Next it was time to start wiring everything up.I started at the front with the aileron and pitch servo wires,trying to keep them clear of the motor.
NOTE ABOUT THE MOTOR.
Before inserting the front servos and any wiring,fit the main gear,head and motor.This is the best time to set gear mesh.Then remove them and remove the motor with its mount.The mesh will stay the same.
Here's a pick of the servo wires near the motor.I had to cable tie them straight to the frame without heat shrinking them first because room is so tight.
Guest- Guest
Re: New 250 pro build.
![]() by Guest 2012-02-20, 01:14
by Guest 2012-02-20, 01:14
Ok well next up was the reciever wiring which was easier to do when removing the gyro tray and the bottom plate for a trial run with the wiring.
This is where I ended up.
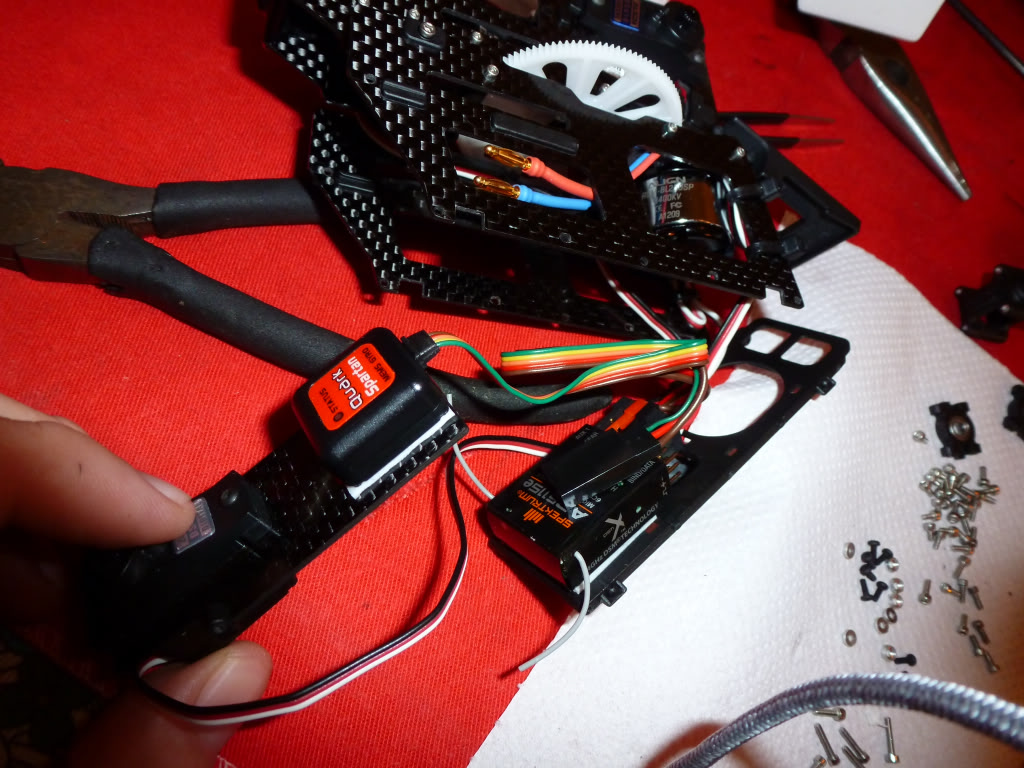
Where I finished up was basically servos,gyro and motor all completed.The frames are all screwed together properly with thread lock.Ive briefly mounted the esc but I'm trying to get it inside the frames so nothing is showing from outside the frames.
The Hyperion battery is far too long to allow the canopy to fit so I've ordered some Align packs for Tuesday.
Once here I can set up the gyro and then hook up the tail servo and hide its cable,then start finishing up.
Here's the last 2 pictures of where I've got to now.


This has to have been the most fiddly wiring job so far taking around 9 hours to get it all hidden.Only thing is this will be a nightmare when stripping down for maintenance.
Still enjoying it though.
Danny.
This is where I ended up.
Where I finished up was basically servos,gyro and motor all completed.The frames are all screwed together properly with thread lock.Ive briefly mounted the esc but I'm trying to get it inside the frames so nothing is showing from outside the frames.
The Hyperion battery is far too long to allow the canopy to fit so I've ordered some Align packs for Tuesday.
Once here I can set up the gyro and then hook up the tail servo and hide its cable,then start finishing up.
Here's the last 2 pictures of where I've got to now.
This has to have been the most fiddly wiring job so far taking around 9 hours to get it all hidden.Only thing is this will be a nightmare when stripping down for maintenance.
Still enjoying it though.
Danny.
Guest- Guest
Re: New 250 pro build.
![]() by Guest 2012-02-20, 22:43
by Guest 2012-02-20, 22:43
Did a fair bit today including some re wiring on a couple of bits that I wasn't happy with.
Then it was landing gear.

Next was the tail and fitting the upgraded tail pitch control arm seen here.

Then I had a problem rebuilding the tail.At the factory they had put lots of thread lock on the tail yoke arms whereby the screws passing through the sleeves had thread locked themselves to the bolts.
I stripped it down cleaning everything which seems to be much better now and I fitted the Kevlar belt to finish the tail.

Then it was landing gear.
Next was the tail and fitting the upgraded tail pitch control arm seen here.
Then I had a problem rebuilding the tail.At the factory they had put lots of thread lock on the tail yoke arms whereby the screws passing through the sleeves had thread locked themselves to the bolts.
I stripped it down cleaning everything which seems to be much better now and I fitted the Kevlar belt to finish the tail.
Guest- Guest
Re: New 250 pro build.
![]() by Guest 2012-02-20, 23:36
by Guest 2012-02-20, 23:36
Last of tonight's pics.
First a pic of the new metal anti rotation guide and the metal canopy mounts.

Next up a shot of the standard canopy.
Also this is where I attached the boom and with the upgraded front boom clamp it's much better than the standard plastic one.

These last 2 photos are with the canomod canopy with of the kit built.Hopefully the batteries will be here tomorrow so I can set it up and do the finishing touches.


Jobs left to do are,
Check belt tension
Setup gyro
Setup tail servo
Instal the servo links and horns
Setup the esc
Get everything at 90
Sort all the curves
Fit the blades
Solder mini deans on everything
Then ready to maiden.
More tomorrow.
First a pic of the new metal anti rotation guide and the metal canopy mounts.
Next up a shot of the standard canopy.
Also this is where I attached the boom and with the upgraded front boom clamp it's much better than the standard plastic one.
These last 2 photos are with the canomod canopy with of the kit built.Hopefully the batteries will be here tomorrow so I can set it up and do the finishing touches.
Jobs left to do are,
Check belt tension
Setup gyro
Setup tail servo
Instal the servo links and horns
Setup the esc
Get everything at 90
Sort all the curves
Fit the blades
Solder mini deans on everything
Then ready to maiden.
More tomorrow.
Guest- Guest
Re: New 250 pro build.
![]() by Guest 2012-02-21, 19:27
by Guest 2012-02-21, 19:27
Just a small update today.
Important note about the servo to swash links.
When you unpack these links at a glance 2 of the 3 appear to be the same length.They are not.
The gap between the ball links are 14.5mm on one,while the other needs to be 16mm.
If you mix these up and try getting 14.5mm out of the slightly longer link then the rod will poke through binding up the link.The result of doing this could quite easily pop the link in flight.
All the links I've done as per the factory lengths.


Now the links have been set I've bound the reciever,setup the esc and done the channel reverse,swash mix and servo select in the gyro's menu.
One last pic for today.

Hopefully I should get it finished tomorrow and I'll post all the transmitter values for JR/Spektrum controllers.I'll make a note if I have to adjust the links from the factory lengths to get +\- 12 degrees.
Almost there.
Danny.
Important note about the servo to swash links.
When you unpack these links at a glance 2 of the 3 appear to be the same length.They are not.
The gap between the ball links are 14.5mm on one,while the other needs to be 16mm.
If you mix these up and try getting 14.5mm out of the slightly longer link then the rod will poke through binding up the link.The result of doing this could quite easily pop the link in flight.
All the links I've done as per the factory lengths.
Now the links have been set I've bound the reciever,setup the esc and done the channel reverse,swash mix and servo select in the gyro's menu.
One last pic for today.
Hopefully I should get it finished tomorrow and I'll post all the transmitter values for JR/Spektrum controllers.I'll make a note if I have to adjust the links from the factory lengths to get +\- 12 degrees.
Almost there.
Danny.
Guest- Guest
Re: New 250 pro build.
![]() by Zaidy 2012-02-21, 23:55
by Zaidy 2012-02-21, 23:55
Nice job there Danny.
So, are you flying it on Saturday at the indoor ?
So, are you flying it on Saturday at the indoor ?
Zaidy- RDMFC Member
- Posts : 1434
RDMFC Bonus points : 1827
Join date : 2009-01-17
Location : Rhos on Sea -
Re: New 250 pro build.
![]() by Guest 2012-02-22, 00:30
by Guest 2012-02-22, 00:30
Cheers Zaide.Yes that is the plan,just gotta order a couple more batteries and some carbon tail blades tomorrow.Them tail blades are very very soft,so they need to go.
You'd enjoy building one of these.
You'd enjoy building one of these.
Guest- Guest
Re: New 250 pro build.
![]() by Guest 2012-02-23, 01:53
by Guest 2012-02-23, 01:53
Today I spent a lot of time on getting the tail geometry right.
Firstly,when setting up a gyro you need to set its endpoints to give maximum throw just before binding occurs.
This isn't about how much the rudder moves with stick input,it's about how much throw the gyro is able to give when it corrects wind or a fast piro stop.
When in the air the amount of stick tail movement is set by using the rudder endpoints.
Onto the 250 now with the spartan.
In the 250 instructions you are told to set the tail servos ball link at 4.5 mm out from centre.This is not for the gyro to work at its best,and I couldn't get the tail to get anywhere near the binding,and with this you are left with a tail that doesn't have much tail pitch range.
The spartan instructions say the ball link should be 7.5 mm out for the 250 and 450 for optimum performance.So when I tried this it made the servo ball link touch the frames which is no good.
After trying all sorts of ways I ended up using a ball link distance of 6.5mm,and this gave just enough throw that it could use all the available tail pitch without the servo link touching the frames.
So to sum up,
Anyone building a 250 pro using the Align 420 tail servo needs to use a servo ball link distance of 6.5mm instead of 4.5.
Tomorrow it should be ready for its maiden,where I'll put up some pics and a full transmitter breakdown setup.
Danny.
Guest- Guest
Re: New 250 pro build.
![]() by Zaidy 2012-02-23, 07:56
by Zaidy 2012-02-23, 07:56
Mr Moff wrote:Cheers Zaide.Yes that is the plan,just gotta order a couple more batteries and some carbon tail blades tomorrow.Them tail blades are very very soft,so they need to go.
You'd enjoy building one of these.
Yes as much as I enjoy going to the dentist !!
The tail blades are soft, so they are forgiving when it smacks the ground
I seen a 250 (if you remember Andy from the fly in a couple of years back) it did everything you dreamed off stock and the blades were soft white plastic I shall look forward to seeking it at the indoor, unless the weather is soooooooooooo glorious where I will be going to the field
Zaidy- RDMFC Member
- Posts : 1434
RDMFC Bonus points : 1827
Join date : 2009-01-17
Location : Rhos on Sea -
Re: New 250 pro build.
![]() by Guest 2012-02-23, 09:02
by Guest 2012-02-23, 09:02
Hi Danny
Been reading your blog with interest
One question-------
Not so sure about the reasoning you gave on changing the recommended length of the tail servo arm radius.
Align do know their stuff and I would be very wary of messing about with their recommended settings unless on test it shows to be wrong.
The argument is based on the well known logic:-
"Where does a gorilla sit when it comes into your sitting room ?"
Answer
"Anywhere it likes"The gyro is the gorilla
The tail servo is directly connected to the gyro.
Whatever the gyro output becomes, then that is one of the signals that sets the tail servo position.
The transmitter signal for the tail servo is an additional signal and, maybe the combined effect of both could overdrive the servo.
Hence their suggestion
Guest- Guest
Re: New 250 pro build.
![]() by Andy Sayle 2012-02-23, 11:14
by Andy Sayle 2012-02-23, 11:14
The Spartan Gyros (and the Align ones, and futaba ones) I have used, do not pass the signal through from the rx to the tail servo. The gyro receives a signal from the rx, and it decides what to do with it by working out things like the current yaw rate, the demanded yaw rate, and a load of other factors that are known only to gyro software programmer types. The calculation also takes into account things like the gain setting etc.
Once that calculation is done (in a tiny tiny amount of time too!) it knows where the servo position should be. So it commands the servo output arm to go to that position. In doing that it performs a check, to make sure it is not moving the servo output arm past the limits defined by the end user as part of the setup process (which is what Danny has done). Basically that process involves teaching the gyro where the "do not exceed these" postions are, and it will NEVER command the servo arm past those points, irrespective of what the signal from the rx is telling it to do.
If you don't setup those limits correctly, you can get problems with binding, or insufficent (or excessive) yaw rates being available, which is what Danny was referring too. setting the linkage length to 6.5mm gives danny the maximum blade angle without any linkage binding, which will in turn allow for the maximum yaw rate, with no mechanical issues, to be commanded by the gyro. That may make for a bonkers mad helicopter, but some pilots are a bit like that......
Andy
Andy Sayle- Club Chairman
- Posts : 4738
RDMFC Bonus points : -487569788
Join date : 2008-11-16
Location : Abergele, North Wales
Re: New 250 pro build.
![]() by Guest 2012-02-23, 11:47
by Guest 2012-02-23, 11:47
Hiya Paul,thanks for the reply.
Basically the servo horn they give you for the tail servo has 3 radius holes in it,
4.5
6.5
7.5
On the last version of the 250 it came with a boom tail servo mount.This made the servo hang quite far below the boom,so the servo horn ball distance was between 8 to 10mm from centre.This only allowed you to use about 40 to 50 degrees of servo movement giving the model far too much mechanical gain,thus making the gyro gain then needed to be extremely low,on my last one it was under 20%.
The spartan for example says in the instructions that if you have to lower the gain below 30% to avoid tail wag,then there's too much mechanical gain,so move the ball link in to allow the gyro gain to be raised above 30%.
The old 250 had lots of bad rep because of the tail not holding and many people simply gave up on their 250.This was why so many aftermarket companies started making upgraded tails for it.
Fast forward to this version and they've listened to all the complaints and moved the servo in between the back of the frames allowing the tail linkage to have a lovely straight shot down the tail,and allowing you to move the linkage close to the centre.
At 4.5 mm when you set the gyros max travel.Say there's 2 cm of available tail movement.It was only using around half of that,so they basically have gone from too much mechanical gain in the old one to very low mechanical gain in this one.
Align say to start at 4.5mm,and if you don't get all the available tail movement move the ball link out one hole.
Spartan say to start at 7.5mm and if the gain has to be lowered below 30% move the ball link in a hole.
7.5mm can't be done because the tip of the servo horn presses against the frame,so 6.5mm is perfect,and allows a good amount of servo movement.
The way they've done this is much better,and should work well.Over on Helifreak and run Ryder the tail on this one has been getting some good reviews.
I'm quite looking forward to trying this hopefully today,if that wind doesn't get any worse.
Guest- Guest
Re: New 250 pro build.
![]() by Guest 2012-02-23, 11:59
by Guest 2012-02-23, 11:59
Excellent description there Andy.
Much better than mine.
Danny.
Much better than mine.
Danny.
Guest- Guest
Re: New 250 pro build.
![]() by Guest 2012-02-23, 12:47
by Guest 2012-02-23, 12:47
I forgot to add about the rudder setup.
Once the gyro is setup,you're rudder endpoints control how fast the tail will pirouette.
On the jr sets the endpoints go to 150% I think,so on most models I usually start at 90% which usually gives a very soft slow tail,and then increase it until it feels how I like.
The higher the number,the faster the tail.
Time to finish up and I'm told as soon as its done I must clear the table or there will be pain.
Danny.
Guest- Guest
Re: New 250 pro build.
![]() by Guest 2012-02-23, 14:41
by Guest 2012-02-23, 14:41
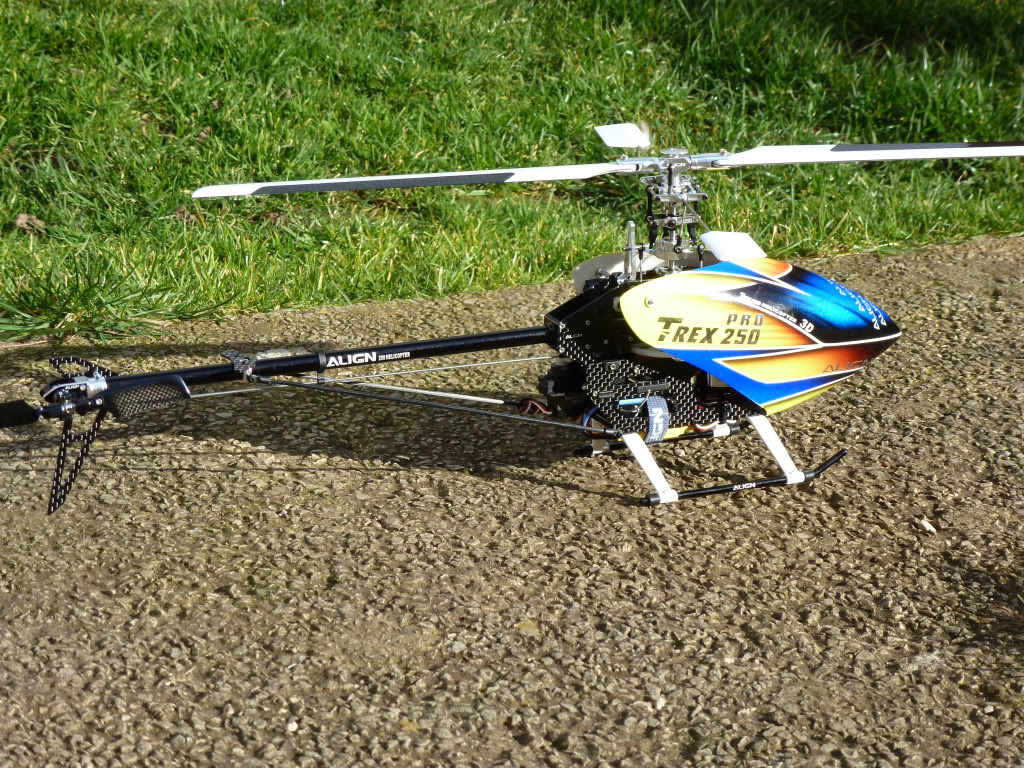
Finished
All ready for its first flight.
The swash links are very close to being perfect straight away.The only small adjustment I did to get zero pitch at centre stick is to make the seesaw links one turn out from factory.This gave zero at centre stick and equal +\- pitch.
With the standard swash mix of 60% for aileron,elevator and pitch you have an obscene amount of swash movement.+\- 16 degrees pitch with no binding.
It's all been tamed down and here is the starting transmitter values.
Servo reverse
I only had to reverse channels 2 and 3
Swash mix
Aileron -45%
Elevator +45%
Pitch +45%
The pitch then gave a more regular +\- 12 degrees.
Dual rates
Elevator 100%
Aileron 100%
Rudder 100%
Expo
Elevator 20%
Aileron 20%
Rudder left linear.
Endpoints
Most of them left at the standard 100% with the exception of,
Gear channel (gyro gain) starting at +30%
Rudder (piro speed) starting at 90%
Throttle curve
Normal flight mode linear
Idle 1 flat line 90%
Idle 2 flat line 100%
Pitch curve
Normal flight mode 35%. 50%. 100%
Giving pitch of. -4. Zero. +12. Degrees.
Idle 1 and 2 left linear for +\- 12 degrees.
This should be a good starting point,and should be fairly tame.After a few flights and final adjustments I'll post the settings I end up at.
I'll grab a few last pictures later once I get chance.
Guest- Guest


Mark Barnes- Club Secretary
- Posts : 6607
RDMFC Bonus points : 8240
Join date : 2008-11-16
Location : Rhyl North Wales
Page 1 of 2 • 1, 2 ![]()
Page 1 of 2
Permissions in this forum:
You cannot reply to topics in this forum|
|
|
» Police crash
» Bit of indoors
» For Sale
» selling up finaly!